# Data handling
How to work with data using the platform
# Advanced input forms
## Usage
In TS it is possible to configure very advanced and dynamic input form behavior. The goal is to minimize the effort required to enter data, and at the same time maximize data quality.
In case you need step-by-step questionnaires or wizards, we recommend looking at [Questionaires](https://wiki.tsnocode.com/index.php?title=Features/Questionaires "Features/Questionaires")
TS has implemented more than 160 fields of various types, as documented in the [Field reference](https://docs.tsnocode.com/books/field-type-reference "Field type reference")
## Validation rules
Validation of field values can follow one of the following
- The value is required
- Can be validated by a Regex expression
- Have a value within a minimum and/or maximum
Value ranges will differ according to data type
- Numbers: The value
- Text: Length of text
- Date: Allowed years
- Files: Number of files
Note that dependencies are resolved before validation, so in case a field is not relevant the validation rule will be ignored.
### Instructions
1. Click on field
- Check of Validation
- Remove check in Allow empty values
## Field dependencies
Fields can be dependent on values in other fields. Specific values, value ranges or list of values.
```
Show SUBCATEGORY if CATEGORY contains either Foo, Bar or Foobar
```
```
Show field NOTES if PRICE is higher than 1000
```
In case the dependency is even more complex, an expression written in JS can be defined and linked to the field
## Workflow dependencies
Fields can be dependent on the records location in the workflow governing that entity. Each status is assigned a status level.
Fields can then refer to the workflow model with restrictions
- Status level FROM
- Status level TO
If the status restrictions are not satisfied the field will be removed and validation requirements will be ignored.
Note that 0 signifies that the status level restriction is disabled.
### Instructions
Learn to setup [Features/Status level dependencies](https://docs.tsnocode.com/books/features/page/status-level-dependencies "Features/Status level dependencies")
## Lookup fields
TS contains a lot of specialized lookup fields that have defined datasources ready
- Danish postal codes
- Danish addresses (DAWA)
- Countries and currencies
- NACE codes (tree searchable)
- UNSPSC codes
- SKS framework (7 subtypes)
The DAWA lookup can also work together with a Google Map. Entering an address will update the map with the location, and clicking on the map will find the address.
## Duplicate prevention
To ensure that the same data are not duplicated by mistake, it is possible to ensure that new records are unique based on values in one or more fields.
Learn to set up [Features/Duplicate prevention](https://docs.tsnocode.com/books/features/page/duplicate-prevention "Features/Duplicate prevention")
# Archived data
The archive mode will enable or disable display of hidden (deleted) elements.
Hidden elements is normally deleted or archived data. They enter the hidden state by having a status assigned, that has a "Hidden" property set.
Toggling the archive mode
- Activate by clicking archive icon
- Deactivate by clicking archive icon AGAIN
When in archive mode display of "normal" elements is disabled.
# Cloning records (Copy/Paste)
### Copy
Copy will put all values in the current record to the clipboard.
Later you can paste the values into a new record, and just change the few values that differ.
Note:
- Only field type data (text, number, dates etc.) will be copied.
- Files and related records will not
### Paste
Paste will put all values in the current record to the clipboard.
Later you can paste the values into a new record, and just change the few values that differ.
Note:
- Only field type data (text, number, dates etc.) will be copied.
- Files and related records will not
# Data reports
In order to see the data you want to
1. Selecting data
2. Working with data
## Selecting data
Data selection in TS is easy due advanced functions
- Partial strings
- Numerical ranges
- Date period ranges
- Included in other views
- Location areas
Criterions may be combined with boolean operators AND and OR
## Personal and shared view
Users will often search for the same data again and again, so they have the option to save a view.
A view will include
- Filter criterions (see above)
- Displayed fields
- Sorting or grouping
Furthermore administrators can share their views with all users on the system.
## Visualizing data
Sets of data can be illustrated and analyzed in many different ways
- Graphs
- Calendars
- Pivot tables
- Kanban board
- Heatmaps
- Google maps
The above reports can also be included as widgets in a Dashboard.
## Statistical testing
Advanced analysis options for data include
- Chi / T / tests
- ANOVA analysis
- Distributions
- Cyclic analysis
In addition Six Sigma tools such as Run charts and Pareto diagrams are included.
# Duplicate prevention
## What it is
Example:
> A hr-management system is used to hire new employees that have to be registered with information such as name and email address. During this registration mistakes can happen where an employee is registered multiple times, creating duplicates in the system with different system ID's. To prevent this there should be some part of the data from the employee that would not impossibly exist for another employee, such as the email address which by design are unique. If you are adding a record of an employee whose email address already exists in the system, then that employee certainly already exists in the system. Other suitable types of data could be Social Security Numbers or CPR numbers, which are also unique by design. If no such suitable data field is available, two or more fields can be used, so that they in combination constitute a unique value. It is for example unlikely that two people with the same name and same date of employment should exist.
## Guide
To prevent duplication when records are created, the entity needs to be set up right. Either a single field or a combination of fields need to be designated as being a unique key, meaning that if you attempt to create another record with the same combination of fields, you will be prevented form doing so. This can be some field with inherently unique data or for example the combination of a date and a name, where the chance of another record sharing the same date and name is considered extremely unlikely.
[](https://docs.tsnocode.com/uploads/images/gallery/2025-04/FjdCExdMOMbziRjo-image.png)
To set a field of an entity to be a unique key, go to that entity in the back-end and select your chosen field as shown in picture 1.
[](https://docs.tsnocode.com/uploads/images/gallery/2025-04/t6oFRARZmuVQ4Cef-image.png)
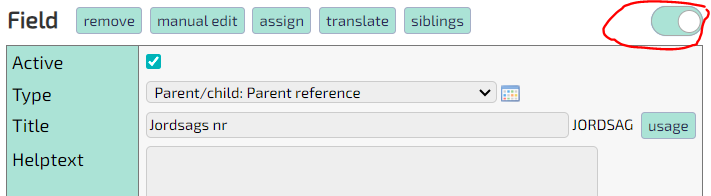
The unique key feature is an advanced one, which means that you have to toggle the advanced view as shown in picture 2.
[](https://docs.tsnocode.com/uploads/images/gallery/2025-04/xE0YCDSy6AKSG2rK-image.png)
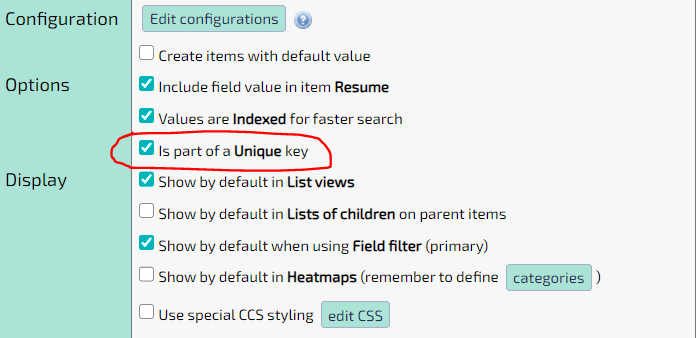
Now enable the check mark as shown in picture 3. Your chosen field is now part of a unique key. If this is the only field with this check mark enabled, then this will be the only key. If you select a second or third field, then the combination of the values of those fields will be the unique key.
# File management
TS solutions will often include files either as related content or generated artifacts.
All you have to do to add file support for a solution, is adding field of type Files. Office files can be edited online (WebDAV) and media files will be handled gracefully.
Note that it is also possible to bulk convert documents to structured data using [AI document conversion](https://docs.tsnocode.com/books/features/page/ai-conversion "Features/AI conversion").
## WebDAV editing
WebDAV will the user to edit files directly without the need for downloading and the uploading the files. Note that you must have WebDAV enabled software such as Microsoft Office installed.
Supported formats include
- Word (docx)
- Excel (xlsx)
- Powerpoint (pptx)
If the server is added as a trusted site, it is also possible WebDAV edit files containing macros (doxm,xlsm,pptm).
### Instructions
1. Enable [WebDAV in configuration](https://wiki.tsnocode.com/index.php?title=WebDAV "WebDAV")
2. Click the icon with pencil overlay to edit a file directly
## Document generation
Documents can be generated by inserting data in special tags in predefined templates.
Output includes
- Word
- Excel
- Powerpoint
- PDF
### Instructions
1. Entity > Advanced
2. In template list press: Add
3. Upload file
- The file can contain tags that must match field name in the solution
4. Set displayed template name
5. Optionally set output fieldname (must be a file field)
## Document signing
Signing will be handled by external providers.
TS supports
- Criipto (MitID, BankID, etc.)
- DocuSign
Unless you need international signatures, TS recommends Criipto. (Docusign pricing is steep and the plans are quite inflexible).
### Instructions
Use the following to set up Criipto document signing
1. Create an appropriate template
2. Add an [Status action](https://docs.tsnocode.com/books/features/page/status-action "Features/Workflow engine")
- Activate codeunit execution
- Set codeunit to
- dk.tempusserva.signing.criipto.CriiptoStatusAction
- dk.tempusserva.signing.criipto.CriiptoStatusActionGenerator
3. Modules > Configurations
- oauthCriiptoAllow: true
- oauthCriiptoClient: From Criipto setup
- oauthCriiptoHost: From Criipto setup
## Media files
Media files are natively supported without the need to change anything
- Images have thumbnails generated
- Videos open in a player
- Videos support streaming (jumping / skipping in the playback)
It is also possible to use specialized fields in solutions
- Files: Pictures
- Image uploads on mobile devices can use camera as a source
- Files: Videos
Note that it is quite easy to set up an automated video scaling process, if the underlying storage is S3.
# Personal views
A View (also called List View) is a specific showing of a list of records from an Entity. Using the search and advanced search functions, you can choose to exclude records form the View using different parameters. The currently active parameters can be seen below the View. To save the parameters of a View for later reuse, click the 'Views' button in the functions menu and give the saved View a name in the text field
[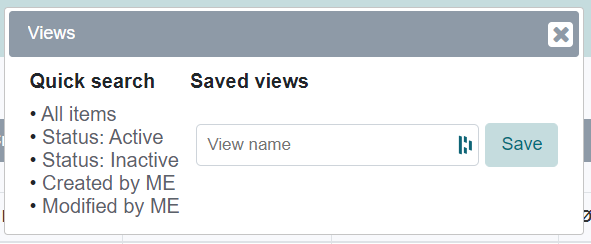](https://docs.tsnocode.com/uploads/images/gallery/2025-04/no9iuwh6JEMkvrCP-image.png)
Initially this saved View is a Personal View, meaning that only you will have access to it. To make it a Shared View, which every application user has access to, navigate to the back-end and select the 'List views' option from the 'Resources' dropdown menu. Now select the name of the View and check the 'Shared' box. The Personal View is now a Shared View instead.
[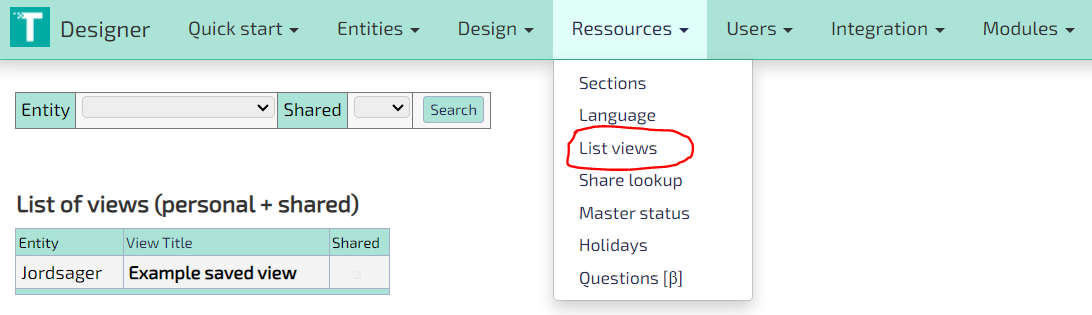](https://docs.tsnocode.com/uploads/images/gallery/2025-04/GjOyRq6WGfSXU80i-image.png)
Other users who use the Shared View are still restricted to the information available to their own user group. You can therefore not accidentally share unauthorized data by making a Shared View.
# QR and NFC actions
QR code and NFC tags are plain and simply access to a URL, often with specific references to records.
The purpose is to ease access to webbased resources, so the user can do things with a simple gesture or action.
Common usecase scenarios are
- Working with inventory
- Consumers accessing information
## Scanner verbs and nouns
TS facilitates a special automation language, where work can be handled simple by scanning codes.
The idea is to, in any order, scanning both
- A reference to a OBJECT to work with
- An ACTION you want to use on the selected object
> The user scans the QR code for order 123. The user scans the QR code for "Order ready". Order 123 changes status to "Order ready".
QR codes for OBJECTs and ACTIONs are typically displayed in templates for easy printing.
## Service pages
Service pages at publicly accessible content, that can be accessed via NFC or QR.
Optimally will redirect from an intermediary URL to the final destination, in order to be able to change the destination after the codes are printed (QR) or written (NFC).
# Questionnaires
## Usages
Questionnaires are used for data collection for external parties.
TS questionnaires can be used in two modes
- A public page everyone with a link can access
- Specific requests sent to a user to add information to a record
Access are given by adding an interface to an existing entity and defining access to fields.
## Interfaces and questionnaires
Normal questionnaire is a link that creates a new record that an anonymous user populates.
Returning questionnaires will be sent to a specific user, and contains access token for an existing record. Tokens are normally sent by status actions, normally to an email field on the record.
### Instructions
Learn how to set up a [questionnaires](https://docs.tsnocode.com/books/features/page/questionnaires "Tutorial/Questionaires") and [Interfaces](https://wiki.tsnocode.com/index.php?title=Integration/Interface "Integration/Interface")
## Quiz and training module
In the quiz module you can set up questions, answers and scores. Afterwards you can set up a questionnaire, with random questions that the user is asked.
Questions are ordered into a structure
1. Domain: Grouping just for order things
2. Topic: Areas questions will be randomized in
3. Question
4. Answer
### Instructions
1. Set up questions: Designer > Ressources > Questions
1. Create a Domain
2. Create a Topic
3. Create multiple questions
1. Add answers and set the correct option
2. Create a questionnaire
1. Add a field of type: eLearning: Quiz suqestion list
1. Add a number of question you want asked
2. Point to the Topic you just created
# Recent Items
This function displays a popup with links for recently accessed items for this type / solution.
The items are named according to their Resume signature - the same which is displayed when searching or when a reference is set for a record.
The recent items are also available from the main menu.
# Relational database
Since the 1960 it has been well known that SQL databases are the way to go for complex systems storage.
TS is based on the MySQL / MariaDB / Percona databases, and all data is fully normalized granting multiple benefits
- High performance with high volumes
- Easy to integrate with BI systems
- Predictable structures
## Scalable applications
Applications built on TS No-code Platform will adhere to common design practices ensuring good performance, stability and integrity. The platform is very scalable in regard to
### Complexity
You can, without limitations, keep extending the models as far as needed, using the Parent and Child relations.
Due to a very elaborate and flexible permission model, multiple user types and use case scenarios are easily supported in a single unified application.
We even support logical constructs such as many-to-many relations. TS has customers running more than 350 linked applications on the same server.
### Performance
TS databases are largely unaffected by data set sizes and number of concurrent users.
There building configurations for indexing fields, and the built in searches can be supported by Elastic search and indexing.
To prove our point we have actually had the whole platform running smoothly on a Raspberry PI.
### Volumes
Databases will handle large amounts of data gracefully, but large object sizes will often cause problems in back/restore scenarios.
TS No-code Platform supports unlimited file size and count, using a mixed database and block storage approach.
## Relational searches
A common problem querying data is specifying criterions and values in different parts of the model
```
Show orders where the sum > 10000, and one or more ordelines refers to the product Smart TV
```
In TS this is handled gracefully by allowing interlinked searches
### Look at parents referring children
1. Make a search in the child items (optionally name the view)
- Set search criterions normally
2. Make another search in parent item
- Set search criterions normally
- In the *List of children* field refer to the CURRENT\_QUERY (or given name)
### Look at children referring parents
1. Make a search in the parent items (optionally name the view)
- Set search criterions normally
2. Make another search in child items
- Set search criterions normally
- In the *Parent reference* field refer to the CURRENT\_QUERY (or given name)
# Searching
A simple search will provide search options for fields already displayed in the list.
The search window provides you with the following options:
- Define filter/search values
- Select which fields to display
- Quick access to analysis
The setup of the list view can be saved for later use by using: [View function](https://docs.tsnocode.com/books/features/page/using-views "Usermanual/WindowViews")
## Setting search values
When setting search criterions these are appended to existing filters. Normally "AND" operators are not needed, as TS assumes an implicit AND between multiple criterions
Example:
1. The list is filtered with: Status = "New"
2. Another criterion is set: Date > 31/12/2012
3. The list now displays only values where
- The field Status has the value "New"
- **AND**
- The field Date has a value greater than 31/12/2012
Criterions are displayed at the bottom of the page, and remain in place until you add the "New search" option when searching or logging out of the system. Note that each criterion can be removed by pressing the minus icon.
## Selecting fields for display
By enabling/disabling the checkbox next to a field, you can control is the field is displayed in the list.
Note that
- It is possible to set criterions for fields that are not displayed
- Data exports til XL includes an option to display ALL fields in an export
## Quick analysis
Some fields have an graph icon next to them, which allows access to analyze this variable.
This will provide you with
- A count of the different values
- A bar or piechart of the data
# Status level dependencies
## What it is
Example:
> A hr-management system is used to show information on employees who are assigned to projects. These employees are either currently working on a project or between projects. Or they might be in the process of being hired and would therefore not be a full employee yet. Depending on which of these states the employee is currently in, different information about them would be made available. If they were under consideration of being hired, we should see their application. If they were working on a project, we should see their work schedule. If they were between projects, we should see the end date of their last project. Each piece of information should only be made visible for the status in question, since they make no sense or are unimportant otherwise. Status level dependencies are used to manage this visibility.
## Guide
[](https://docs.tsnocode.com/uploads/images/gallery/2025-04/Vowl88DgafccJuLE-image.png)
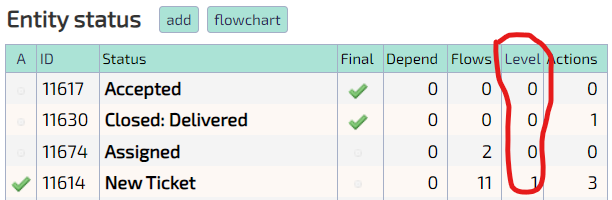
Status levels are numerical categories that one or more statuses can belong to. Individual Fields in an Entity can be configured to depend on these levels such that they can be made inactive and hidden if the Entity record is not in a status with the correct level. For example can the dependency be set for all status levels above a certain value such that one or more Fields are only active and displayed for those levels. To see the status levels of an Entity's statuses, go to that Entity in the back-end and look in the column shown in picture 1.
[](https://docs.tsnocode.com/uploads/images/gallery/2025-04/ieryVuAVdAcCHqdK-image.png)
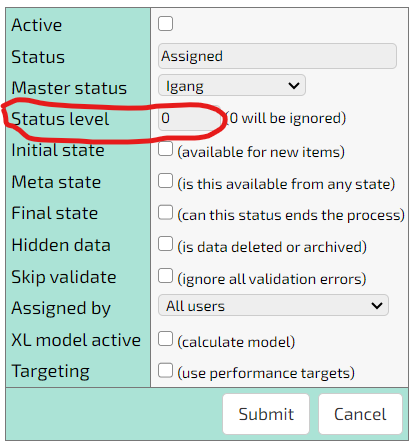
To change a status's level, go to that status and edit it as shown in picture 2.
[](https://docs.tsnocode.com/uploads/images/gallery/2025-04/LQHELQhGFN1mdwsZ-image.png)
[](https://docs.tsnocode.com/uploads/images/gallery/2025-04/oqcZhiKMnZ2XYI0s-image.png)
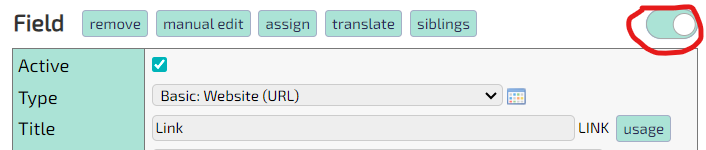
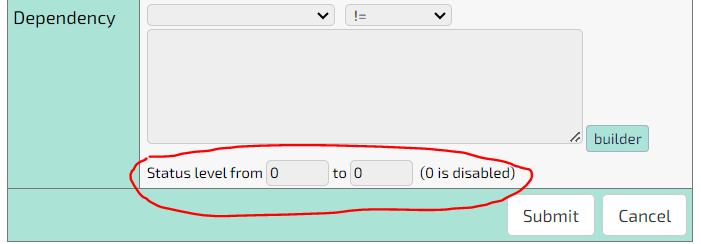
To set the dependency, toggle the advanced view of the Entity panel on as shown in picture 3 and go to the bottom as shown in picture 4.
# Using Views
The view dialogue allows you to save searches and field selection in views.
The views are normally personal and will only be displayed for you as a user. The administrator can however share already created views, which are usable but not editable for you.
## Creating views
After selecting fields and setting search criterions, you can save the setup for later use by
- Setting a name in the textbox for the view
- Pres "Save"
The named view is now displayed in this dialogue as well as on the solution overview (the page shown after login).
## Deleting views
In order to delete a view just press the red minus icon next to the view.
## Changing views
It is currently not possible to edit views after their creation, but you can always make copies with the same name
1. Click the view you want to change
2. Make modifications
3. Save the view using the same name as before
4. Delete the old view
# Viewing and editing data
Work in progress...