Standard Integrations
System integration options including REST services
- Docusign Integration
- E-Boks doc2mail
- Install components
- Test commandline setup
- Server configuration: Linux
- Server configuration : Windows
- Sending emails
- Embed TS in other sites
- MitID Integration
- OLAP
- WebDAV
- LDAP
- Jobnet
- Link to QR codes
- Oauth2 authentication
- Outlook calendar
- Pentaho
Docusign Integration
Prereq
To set up DocuSign integration an account that meets one of the following criteria is needed.
- A DocuSign-partner or
- Advanced developer" license
To use the integration, the uploading user only needs a regular eSignature subscription.
The integration will initially be created in demo mode and has to be approved, before it can be moved to production.
Approval requires 20 consecutive successful uploads performed within the last 30 days.
After that, an account with the proper access permissions has to sign in and the integration will be transferred to their account.
Setup in DocuSign
First: Sign in with an admin account and create a new "Integration" under "Settings" -> "Integrations" -> "Apps and Keys". Give it a descriptive name. This name will be shown to all who upload documents via the integration.
Second: Add a "Secret Key", save it. This is needed for docuSignSecretKey.
Third: Under "Redirect URIs" provide a URL using the following syntax:
https://[domain]/[TS-app-name]/[docuSignAuthCallbackUrl]
URL Example: https://omega.tempusserva.dk/TempusServa/main?command=dk.tempusserva.signing.docusign.PageLoginCallback
Setup in TS
There are 11 parameters available. Seven of these (marked with an asterisk below) must be set for the integration to work:
- docuSignActive*
- docuSignLog
- docuSignApiHost*
- docuSignAuthHost*
- docuSignHost*
- docuSignAccountId*
- docuSignIntegrationKey*
- docuSignSecretKey*
- docuSignAuthCallbackUrl
- docuSignEventCallbackUrl
- docuSignBrandId
The Field Type Component for which DocuSign upload should be available must be changed from "Files: Documents" to "Files: Documents with signing".
docuSignActive
To enable the DocuSign functionality, this has to be set to "true".
docuSignLog
This is used for debugging and should not be enabled in production.
It enables debuggin-logs on all uploads, both in TS and in DocuSign, thus breaking confidentiality, because all parameters will be saved to a log somewhere.
docuSignApiHost
This parameter is account-dependant.
It can be found on the "Apps and Keys" page in DocuSign, labeled "Account Base URI".
docuSignAuthHost
This parameter should always be "https://account-d.docusign.com/oauth/" when testing the integration and "https://account.docusign.com/oauth/", when the integration is in production.
docuSignHost
This parameter is account-dependant. It is used to redirect the user, after a successful upload.
It's value should be "https://appdemo.docusign.com" during testing.
The production value is found by signing in with an account, that will be using the integration, and then copying the URL from the browser. Remember to only copy from beginning to end of docusign.com, don't include the trailing /.
docuSignAccountId
This attribute is account-dependant.
It can be found on the "Apps and Keys" page in DocuSign, labeled "API Account ID".
It's a GUID, formatted like this: XXXXXXXX-XXXX-XXXX-XXXX-XXXXXXXXXXXX
docuSignIntegrationKey
This parameter is integration-dependant.
It can be found on the "Apps and Keys" page in DocuSign, or when viewing the details about the integration.
It's a GUID, formatted like this: XXXXXXXX-XXXX-XXXX-XXXX-XXXXXXXXXXXX
docuSignSecretKey
This parameter is integration-dependant.
It can be found when viewing the details about the integration, in DocuSign.
You will only have access to the entire key when creating it, but you can just add a new one if the key is lost. Remember to delete the old one.
It's a GUID, formatted like this: XXXXXXXX-XXXX-XXXX-XXXX-XXXXXXXXXXXX
docuSignAuthCallbackUrl
This parameter I static and should always be
"main?command=dk.tempusserva.signing.docusign.PageLoginCallback".
docuSignEventCallbackUrl
This parameter is static and should always be
"docusign-event-callback".
docuSignBrandId
This parameter is optional.
In DocuSign it is possible to create "Brands" ("Settings" -> "Account" -> "Brands").
All brands have a unique ID, it doesn't have to be the owner of the integration that creates the brand.
To enable custom branding in email, the signing formula, etc., input the brandID here.
If this parameter is left is empty, the default DocuSign branding will be used.
It's a GUID, formatted like this: XXXXXXXX-XXXX-XXXX-XXXX-XXXXXXXXXXXX
Moving to production
When moving the integration to production, the following should be taken into account.
Make sure to complete 20 successful uploads in a row within 30 days.
Uploads don't have to be full featured documents, empty ones will do, and they don't have to be different documents, you can upload the same document 20 times.
If the production account is different from the test account, the following parameters should be updated:
- docuSignAccountId
- docuSignApiHost
Make sure to change the following parameters:
- docuSignHost
- docuSignAuthHost
If the TS Application for test and production are different (different base URL), remember to add the "Redirect URIs" in DocuSign. And make sure that docuSignLog is set to false.
E-Boks doc2mail
Install components
Before you start ensure Java 8 is the default
Certificate
Ensure you have a valid certificate
sudo nano /mnt/sda/certs/doc2mail.pkeCopy paste contents of the certificate
sudo chmod 777 /mnt/sda/certs/doc2mail.pkeBinaries
Download OneTooX implementation
cd /mnt/sda/deploy
sudo wget https://www.tempusserva.dk/install/doc2mail/doc2mail.zip
unzip doc2mail.zip
sudo mv lib doc2mail
cd doc2mail
sudo chmod 777 *Test commandline setup
In this step you will configure and test the configuration for the commandline
Update the parameters below
- i: Location of a test PDF
- t: Name of the document type
- r: A real CPR number
Execute the following command
java -cp .:/mnt/sda/deploy/doc2mail/* dk.doc2mail.client.FileUploaderClient --address "https://privat.doc2mail.dk/delivery/FileUploader.asmx" --certificate "/mnt/sda/certs/doc2mail.pke" -i "/tmp/eboks_test.pdf" --title "Oplysningsskemaet" -d ebokskmdprint -u "domainX\userY" -t "tempus serva" --ss "Oplysningsskema" --testmode 3 -r 1234561234 --rt CPRA success message will look something like
 <uploadStatus>
   <deliveryInformation>
       <destination>5</destination>
       <errorCode>0</errorCode>
       <id>148069122</id>
       <mailPriority>B</mailPriority>
       <responseInfo>No response</responseInfo>
       <status>OK</status>
       <succeeded>true</succeeded>
   </deliveryInformation>
   <message>OK</message>
   <success>true</success>
   3379
</uploadStatus>Server configuration: Linux
In this step you will deploy the commandline configuration
Make the following substitutions
- i: $DOCUMENT
- title: $TITLE
- r: $CPR
- testmode: 0
The connection string should look something like
java -cp .:/mnt/sda/deploy/doc2mail/* dk.doc2mail.client.FileUploaderClient --address "https://privat.doc2mail.dk/delivery/FileUploader.asmx" --certificate "/mnt/sda/certs/doc2mail.pke" -i "$DOCUMENT" --title "$TITLE" -d ebokskmdprint -u "domainX\userY" -t "tempus serva" --ss "Oplysningsskema" --testmode 0 -r $CPR --rt CPRCreate execution script
cd /mnt/sda/deploy/doc2mail
sudo nano send.sh
Paste the execution script (above)
DOCUMENT=$1
CPR=$2
TITLE="$3 $4 $5 $6 $7"
java -cp .:/mnt/sda/deploy/doc2mail/* dk.doc2mail.client.FileUploaderClient --address "https://privat.doc2mail.dk/delivery/FileUploader.asmx" --certificate "/mnt/sda/certs/doc2mail.pke" -i "$DOCUMENT" --title "$TITLE" -d ebokskmdprint -u "domainX\userY" -t "tempus serva" --ss "Oplysningsskema" --testmode 0 -r $CPR --rt CPRThe set up permissions for the script
sudo chmod 777 send.shCopy the value to the server configuration parameter
- Modules > Static content > Add
- Set title = eboksIntegrationTemplate
/mnt/sda/deploy/doc2mail/send.sh @@DOCUMENT@@ @@CPR@@ @@TITLE@@Set doc2mail as ebox provider
- Edit the setting eboksProvider (url: ServerSettingSingle.do?PolicyName=eboksProvider&DataType=3)
- Set the value to: doc2mail
Activate token rewrites
- Edit the setting interfaceTokenRewrite (url: ServerSettingSingle.do?PolicyName=interfaceTokenRewrite&DataType=1)
- Set the value to true
- Edit the setting interfaceTokenRewriteUrl (url: ServerSettingSingle.do?PolicyName=interfaceTokenRewriteUrl&DataType=3)
- Set the value to https://svar.link/FOOBAR/
- FOOBAR is the name of your application as registered in svar.link
Reboot the server
Server configuration : Windows
In this step you will deploy the commandline configuration
Make the following substitutions
- i: @@DOCUMENT@@
- title: @@TITLE@@
- r:@@CPR@@
- testmode: 0
The connection string should look something like
java -cp .:/mnt/sda/deploy/doc2mail/* dk.doc2mail.client.FileUploaderClient --address "https://privat.doc2mail.dk/delivery/FileUploader.asmx" --certificate "/mnt/sda/certs/doc2mail.pke" -i "@@DOCUMENT@@" --title "@@TITLE@@" -d ebokskmdprint -u "domainX\userY" -t "tempus serva" --ss "Oplysningsskema" --testmode 0 -r @@CPR@@ --rt CPRCopy the value to the server configuration parameter
- Modules > Static content > Add
- Set title = eboksIntegrationTemplate
- Set value the string above
Set doc2mail as ebox provider
- Edit the setting eboksProvider (url: ServerSettingSingle.do?PolicyName=eboksProvider&DataType=3)
- Set the value to: doc2mail
Activate token rewrites
- Edit the setting interfaceTokenRewrite (url: ServerSettingSingle.do?PolicyName=interfaceTokenRewrite&DataType=1)
- Set the value to true
- Edit the setting interfaceTokenRewriteUrl (url: ServerSettingSingle.do?PolicyName=interfaceTokenRewriteUrl&DataType=3)
- Set the value to https://svar.link/FOOBAR/
- FOOBAR is the name of your application as registered in svar.link
Finally reboot the server
Sending emails
Preparations
Get the information of the outbound server
- Server address
- Mail account
Note that the SMTP server may be the same as the IMAP or POP server
Setup in Tempus Serva backend
Go to: Designer > Modules > Configuration
In the 'Text' search field, search for Server settings containing smtp
| Alias | Empty | Meaning | Example |
|---|---|---|---|
| smtpServer | No | URL for the outgoing SMTP server | send.one.com |
| smtpSystemEmail | No | Sender address on email sent from the server | noreply@acme.com |
| smtpUsername | Yes | Account name for sending emails | noreply@acme.com |
| smtpPassword | Yes | Password for the above account | secret1234 |
Communication with the SMTP server can be tweaked using
| Alias | Meaning | Example |
|---|---|---|
| smtpUseTLS | Use TLS communication | true |
| smtpMailDelay | Throtling between each mail (seconds) | 500 |
| smtpSendRetries | Number of attemts to send each mail | 3 |
In order to test applications a testmode can be activated
| Alias | Meaning | Example |
|---|---|---|
| smtpTestMode | Activates the test mode | true |
| smtpTestEmail | Email that receives all emails when in testmode | someone@acme.com |
Embed TS in other sites
To embed the output of a public codeunit, on another website, the following code can be used.
<div id="tsContent"></div>
<script type="text/javascript">
    $.ajax({
        url: 'https://[SYSTEM-DOMAIN]/[APP-NAME]/mainpublic?command=[CODEUNIT-NAME]]',
        success: function(data) {
            $('#tsContent').html($(data).find(".mainContent").html());
        },
    });
</script>
It requires jQuery to be loaded beforehand.
MitID Integration
What it does
We have a generic integration to Criipto (a MitID, and other eID, broker) and an account, allowing for sign in and document signing with MitID/nemID.
Sign in
Sign in can be setup as a webinterface or as SSO from the login-page (not fully supported yet), the authentication method isn't available in the dropdown for the webinterface, as of writing, it has to be set through the database (the live database).
UPDATE forminterface SET AuthenticationType = 5 WHERE InterfaceID = [ID];Document signing
One or multiple documents can be send for signature, one or more people can sign the batch and it is possible to enforce CVR or CPR. This process can be initiated from a StatusAction or be accessing a url.
A page is appended to the signed documents showing who signed it and when, in the order they signed it.
Prereq
To setup this an "Application" has to be set up in Criipto, one for sign in and one for signatures, and a CNAME dns-record has to be created.
The ID's and secrets created here will be needed later.
Setup in Criipto
First, a domain has to be added.
Haed to the Criipto Dashboard, select "Domains" in the menu, make sure that you are in "Production", click "Add production domain".
Name it [customer]-eid.tsnocode.com and head to CloudFlare and add a CNAME record that points to idp.criipto.id.
Once the domain is active you can progress.
Sign in
Coming
Document signing
Requires version 7336 or newer.
Head to "Application" in the Criipto menu, click "Add signatures application" (if it exits), otherwise click "Add login application" and add ?tags=signatures to the end of the url.
Name the application [customer] eSign, select their domain and check the eID's that should be available, select java as technology.
A secret might pop up or be shown, take note. It is possible to add more after the fact and re-issue them.
Setup in TS
There are a lot of parameters available. Some of these must be set for the integration to work, depending on the integration.
Sign in
Coming
Policies
- oauthCriiptoAllow
- oauthCriiptoHost
- oauthCriiptoClient
- oauthCriiptoSecret
Document signing
To start the signing process, setup the configuration and execute a Status Action that executes the codeunit dk.tempusserva.signing.criipto.CriiptoStatusAction or dk.tempusserva.signing.criipto.CriiptoStatusActionGenerator or dk.tempusserva.signing.criipto.CriiptoStatusActionGeneratorAlt or access a url with command=dk.tempusserva.signing.criipto.CriiptoPage&SagID=[SagID]&DataID=[DataID] (not ready).
This will try to lookup and send the document(s) out for signing.
Configurations
| Configuration | Description |
|---|---|
| Signer.MultipleSigners | Whether multiple signers is allowed (true/false) |
| Signer.MaximumSigners | How many signatures are needed. Defaults to "COUNT", which counts the number of signers, when using MultipleSigners, otherwise 1. Can otherwise be set to a number. |
| Signer.ExpiresInDays | Number of days the recipient has to sign the document. Default is 30. |
| Signer.FieldMaximum | Not implemented |
| Signer.FieldFil * | System name for the field with documents that should be send, all documents found here will be send. Defaults to "FILES". Also used to store generated files. |
| Signer.FieldCPR | System name for the field with a CPR, that the signer has to have to sign the document. Also used with MultipleSigners. |
| Signer.FieldCVR | System name for the field with a CVR, that the signer has to have to sign the document. Also used with MultipleSigners. |
| Signer.FieldEmail * | System name for the field with an email, that will be notified about the signature request. Also used with MultipleSigners. Defaults to "EMAIL". |
| Signer.FieldSigners | System name for a list-of-children-field. All records found here will be required to sign the document. Required when using MultipleSigners. |
| Signer.StatusError | Status that the record should enter if the signature request failed (was rejected or timed out). Defaults to 0. |
| Signer.StatusSigned | Status that the record should enter when all signatures are collected. Defaults to 0. |
| Signer.StatusUploaded | Status that the record should enter when it has been uploaded to signing service. Defaults to 0. |
| Signer.StatusDisableCodeunits | Whether codeunits should be executed or not, when the signing completes or fails. Defaults to false (do execute). |
| Signer.EmailSubject | The subject of the email send to the signer. Defaults to "Dokument til signering". |
| Signer.EmailBody | The email-body of the email send to the signer. Defaults to "Du kan underskrive her: {LINK}". |
| Signer.NotificationSubject | The subject of the email send to EmailWarner, when all signatures have been collected. Defaults to "Dokument til signering er blevet underskrevet" |
| Signer.NotificationBody | The body of the email send to EmailWarner, when all signatures have been collected.
Defaults to "Alle parter har nu underskrevet dokumentet. {LINK}". Links to the record. |
| Signer.NotificationBodyExt | The body of the email send to all signers of a document, when all have signed.
Defaults to "Alle parter har nu underskrevet dokumentet. Du kan downloade det underskrevne dokument her: {LINK}". Links to the signed document at Criipto. |
| Signer.EmailWarner | Can be an email or the system name of a field containing an email.
The email found here will be notified when a signature fails and completes. If an email is not found, the email of the current user will be used, if not a status action. Required for status action. |
| Signer.WarningSubject | The subject of the email send to EmailWarner, when a signature request fails. Defaults to "Dokument til signering blev afvist". |
| Signer.WarningBody | The body of the email send to EmailWarner, when a signature request fails. Defaults to "En underskrift blev afvist. {LINK}". Links to the record. |
| Signer.CriiptoClientID * | The client ID from Criipto application. |
| Signer.CriiptoClientSecret * | The client secret from Criipto application. |
| Signer.OverwriteOnReupload | true/false, default false. If enabled the system allows re-sending a record for signing, overwriting the old one. |
| Signer.FileName | Name of generated file, defaults to kontrakt.docx, used by CriiptoStatusActionGenerator |
| Signer.TemplateID | ID of template to be rendered and saved before sending it of to be signed, used by CriiptoStatusActionGenerator |
| Signer.FileNameAlt | Name of generated file, defaults to kontrakt.docx, used by CriiptoStatusActionGeneratorAlt |
| Signer.TemplateIDAlt | ID of template to be rendered and saved before sending it of to be signed, used by CriiptoStatusActionGeneratorAlt |
OLAP
OLAP example
We have a solution
- Change management [changemanagement]
The solution contains the following lookup fields
- Scope [TYPE]
- Type [TASKTYPE]
It also has some decimal values
- Estimate [ESTIMATE]
- Realized [REALIZED]
In our reporting we want to see distributions by
- A period hierarchy: Year / Quarter / Month
- Categories by Scope, Type and Status
Setting up the cube
A new OLAP cube is set up in: "Integration" > "OLAP cubes" > "Add"
Basic information
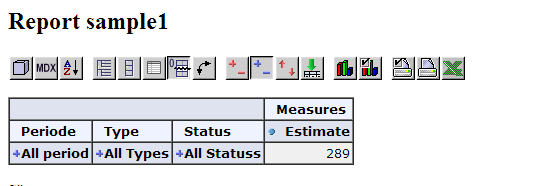
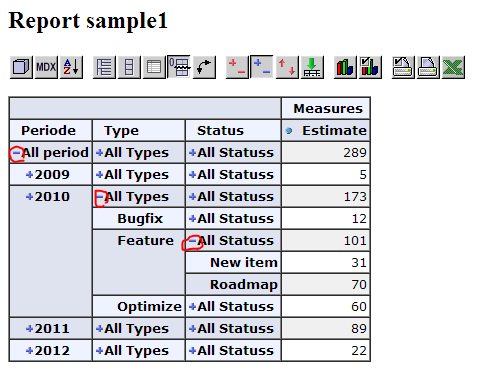
- Name display: sample1
- Cube header: Report sample1
Cube definition ("Cube Schema XML")
For further help to designing schemas please refer to the following ressources
<Cube name="sample1cube">
  <Table name="data_changemanagement"/>
  <Dimension name="Scope" foreignKey="TASKTYPE">
    <Hierarchy hasAll="true" primaryKey="LookupID">
    <Table name="formfieldlookup"/>
      <Level name="Type" column="Value" uniqueMembers="true"/>
    </Hierarchy>
  </Dimension>
  <Dimension name="Type" foreignKey="TYPE">
    <Hierarchy hasAll="true" primaryKey="LookupID">
    <Table name="formfieldlookup"/>
      <Level name="Type" column="Value" uniqueMembers="true"/>
    </Hierarchy>
  </Dimension>
  <Dimension name="Status" foreignKey="StatusID">
    <Hierarchy hasAll="true" primaryKey="StatusID">
    <Table name="formstatus"/>
      <Level name="Type" column="Status" uniqueMembers="true"/>
    </Hierarchy>
  </Dimension>
  <Dimension name="Period" type="TimeDimension">
    <Hierarchy name="Periode" hasAll="true" allMemberName="All period">
      <Table name="data_changemanagement"/>
      <Level name="Aar" levelType="TimeYears" uniqueMembers="true">
        <KeyExpression>
          <SQL dialect="mysql">Year(CreatedAt)</SQL>
          <SQL dialect="generic">YEAR</SQL>
        </KeyExpression>
      </Level>
      <Level name="Kvartal" uniqueMembers="false" levelType="TimeQuarters">
        <KeyExpression>
          <SQL dialect="mysql">Quarter(CreatedAt)</SQL>
          <SQL dialect="generic">Quarter</SQL>
        </KeyExpression>
      </Level>
      <Level name="Maaned" uniqueMembers="false" levelType="TimeMonths">
        <KeyExpression>
          <SQL dialect="mysql">Month(CreatedAt)</SQL>
          <SQL dialect="generic">Month</SQL>
        </KeyExpression>
      </Level>
    </Hierarchy>
  </Dimension>
  <Measure name="Revision" column="Revision" aggregator="sum" formatString="Standard"/>
  <Measure name="Estimate" column="ESTIMATTIMER" aggregator="sum" formatString="Standard"/>
  <Measure name="Realized" column="REALISERETTIMER" aggregator="sum" formatString="Standard"/>
</Cube>
MDX query ("Cube Query MDX")
For further help to designing queries please refer to the following ressources
SELECT
  NON EMPTY {([Measures].[Estimate],[Measures].[Realized])} ON COLUMNS,
  NON EMPTY {([Period],[Type],[Status])} ON ROWS
FROM [sample1cube]
Results
The cube is acccesed via this URL (or press "test" form the OLAP overview) http://YOUR_DOMAIN/TempusServa/olapview.jsp?query=sample1
Schema cheatsheet
Introduction
The below paragraphs contains sample snippets for your OLAP schema.
Precise documentation on how to define a schema, can be found at: http://mondrian.pentaho.com/documentation/schema.php
Schema structure overview
- Table (one):
- Structure: The centre table containing the measures (FACT table)
- OLAP cube: Not displayed
- Dimensions (many)
- Structure: Related tables or groupable values (FACT table relations)
- OLAP cube: Columns/row "headers" in the cube
- Measures (many)
- Structure: Values found in the centre table (FACT table values)
- OLAP cube: Numbers to be displayed in the table cells
Defining dimensions for related values
Standard lookup value
The cube schema below only needs adjustment for the system name of the lookup field.
Structure
| Solution as displayed | "Sample solution" : "Category" = xxx |
| Solution system names | sample : CATEGORY = xxx |
| Database table names | data_sample : CATEGORY = xxx |
Data model
- data_sample
- CATEGORY: Field containing the lookup value
Cube schema
...
<Dimension name="Example" foreignKey="CATEGORY">
   <Hierarchy hasAll="true" primaryKey="LookupID">
      <Level name="Category" column="Value" uniqueMembers="true" />
   </Hierarchy>
</Dimension>
...
Simple choice value
The cube schema below only needs adjustment for the system name of the lookup field.
Structure
| Solution as displayed | "Sample solution" : "My choice" = xxx |
| Solution system names | sample : CHOICE = xxx |
| Database table names | data_sample : CHOICE = xxx |
Data model
- data_sample
- CHOICE: Field containing the lookup value
Cube schema
...
<Dimension name="Example" foreignKey="CHOICE">
   <Hierarchy hasAll="true" primaryKey="ChoiceID">
      <Level name="Answer" column="Value" uniqueMembers="true" />
   </Hierarchy>
</Dimension>
...
Standard record Status
The cube schema below can be copied directly without modification: The status properties and tablenames are allways the same.
Structure
| Solution as displayed | "Sample solution" : "Status" = xxx |
| Solution system names | sample : "StatusID" = xxx |
| Database table names | data_sample "StatusID" = xxx |
Data model
- data_sample
- StatusID: Field containing status reference (allways the same)
Cube schema
...
<Dimension name="Example" foreignKey="StatusID">
   <Hierarchy hasAll="true" primaryKey="StatusID">
      <Level name="Status" column="Status" uniqueMembers="true" />
   </Hierarchy>
</Dimension>
...
Defining dimensions for related records
Structure
| Solutions as displayed | "Some child" : "Parent" -> "Father or mother" |
| Solution system names | child : PARENT -> parent |
| Database table names | data_child : PARENT -> data_parent |
Data model
- data_child
- PARENT: Key to the "parent" solution
- data_parent
- GRANDPARENT: Key to the "grandparent" solution
- PARENTNAME: Descriptive field
Cube schema
...
<Dimension name="Example" foreignKey="PARENT">
   <Hierarchy hasAll="true" primaryKey="DataID" primaryKeyTable="data_parent">
      <Level name="Parent" column="PARENTNAME" uniqueMembers="true" />
   </Hierarchy>
</Dimension>
...Note that the schemas for multi join tables are written from "inside out", that might seem counterintuitive i relation to what you want to display in the cube later.
Structure
| Solutions as displayed | "Some child" : "Parent" -> "Father or mother" : "Grand parent" -> "Grandma and Grandpa's" |
| Solution system names | child : PARENT -> parent : GRANDPARENT -> grandparent |
| Database table names | data_child : PARENT -> data_parent : GRANDPARENT -> data_grandparent |
Data model
- data_child
- PARENT: Key field pointing to the "parent" solution
- data_parent
- GRANDPARENT: Key field pointing to the "grandparent" solution
- PARENTNAME: Descriptive field
- data_grandparent
- GRANDPARENTNAME: Descriptive field
Cube schema
...
<Dimension name="Example" foreignKey="PARENT">
   <Hierarchy hasAll="true" primaryKey="DataID" primaryKeyTable="data_parent">
      <Join leftKey="GRANDPARENT" rightKey="DataID" />
      <Level name="Grandparent" table="data_grandparent" column="GRANDPARENTNAME" uniqueMembers="true" />
      <Level name="Parent" table="data_parent" column="PARENTNAME" uniqueMembers="true" />
   </Hierarchy>
</Dimension>
...
Defining dimensions for inline values
Text values
Cube schema
 ...
 <Dimension name="Category">
     <Hierarchy hasAll="true">
         <Level name="Name" column="NAME" uniqueMembers="true"/>
     </Hierarchy>
 </Dimension>
 ...
Year/integer values
Cube schema
 ...
 <Dimension name="Period" type="TimeDimension">
     <Hierarchy hasAll="true">
         <Level name="Aar" column="YEAR" type="Numeric" uniqueMembers="false" levelType="TimeYears"/>
     </Hierarchy>
 </Dimension>
 ...
Date / datetime values
Cube schema
...
<Dimension name="Period" type="TimeDimension">
   <Hierarchy name="Periode" hasAll="true" allMemberName="All period">
      <Level name="Aar" levelType="TimeYears" uniqueMembers="true">
         <KeyExpression>
            <SQL dialect="mysql">Year(CreatedAt)</SQL>
            <SQL dialect="generic">YEAR</SQL>
         </KeyExpression>
      </Level>
      <Level name="Maaned" uniqueMembers="false" levelType="TimeMonths">
         <KeyExpression>
            <SQL dialect="mysql">Month(CreatedAt)</SQL>
            <SQL dialect="generic">Month</SQL>
         </KeyExpression>
      </Level>
   </Hierarchy>
</Dimension>
...
Enumeration values
Cube schema
 ...
 <Dimension name="Severity">
     <Hierarchy hasAll="true" primaryKey="SEVERITY">
         <InlineTable alias="enumeration">
         <ColumnDefs>
             <ColumnDef name="id" type="Numeric"/>
             <ColumnDef name="desc" type="String"/>
         </ColumnDefs>
         <Rows>
             <Row>
                 <Value column="id">1</Value>
                 <Value column="desc">High</Value>
             </Row>
             <Row>
                 <Value column="id">2</Value>
                 <Value column="desc">Medium</Value>
             </Row>
             ... more values ...
        </Rows>
     </InlineTable>
     <Level name="Severity" column="id" nameColumn="desc" uniqueMembers="true"/>
 </Hierarchy>
 </Dimension>
 ...
Defining measures
Normal values
Measures are allways numeric values, that can be agggated to higher levels (the levels in the dimensions)
| Type | Aggregator | Examples |
|---|---|---|
| Sums | SUM | Time spent, costs |
| Average | AVG | Process time |
Cube schema
Calculated values
Analyse Activity
User activity will display an OLAP cube for changes and updates to certain solutions.
Changes are defined by updates to the underlying record.
How to activate this feature
- User must have the Business analyst property set
- The solution must have Activity monitoring property set
- The service OLAP Activity must be active
Analyse Flowsteps
User activity will display an OLAP cube for flow in each process step for certain solutions.
The total flow time is defined as the time span between entry and exit point in time for each flow step (status).
Furthermore each status can have targets for good performance defined:
- Goal: Expected process time in this step
- Tolerance: Acceptable process time in this step
How to activate this feature
- User must have the Business analyst property set
- The solution must have Activity monitoring property set
- The service OLAP Flowsteps must be active
Analyse Flowtotal
User activity will display an OLAP cube for total flow time to certain solutions.
The total flow time is defined as the time span between creation and point in time where a final status i reached.
Furthermore each solution can have targets for good performance defined:
- Goal: Expected total process time
- Tolerance: Acceptable total process time
How to activate this feature
- User must have the Business analyst property set
- The solution must have Activity monitoring property set
- The service OLAP Flow total must be active
WebDAV
About our WebDAV implementation
Supported document types: Word, Excel, Powerpoint.
The implementation does not require SSL to be enabled on the server, but it is recommended.
Sometimes the action of saving a file, that was opened using WebDAV will fail, but only the fist time, if it happens at all.
To fix this, you just have to save the document again, and the issue will be gone for you, until you re-sign-in.
How to enable
Toggle the policy webdavSupport and webdavSessionTokens to true.
When WebDAV is enabled, the files-field, will add tiny pencils next to the supported file-types.
Clicking on the file icon will prompt the file to be opened in the associated application. Clicking on the filename, will prompt a download of the file.
You can control how long the auth-tokens are valid for, using policy webdavSessionLifetime.
You can control whether a token should automatically be re-validated if it times out using policy webdavSessionTokensRevalidate.
Testing WebDAV
Upload a word or excel file to a file field and save the record.
Re-open the record and click the type icon with the pencil next to the file name.
If the appropriate program opens, edit the file and save it.
Close the program.
Open the file again (either download it or re-open it via WebDAV), if your changes are still there, WebDAV is working.
Common config issues
The following policies have to be set up correctly, otherwise the WebDAV feature will not work.
applicationServer
applicationIsBehindAReverseProxy
applicationName
applicationBasePath
securitySslPages
Map WebDAV as a drive
Add a network location with the address https://[domain]/[app]/webdav/drive/.
On linux, replace the protocol with davs.
Enabling basic auth to your server
Office has stopped officially supporting Basic-auth, which is the backup authentication for our implementation.
To allow Office to connect to your server, and authenticate using Basic-auth, execute the following command, as admin, from the commandline.
REG ADD HKEY_CURRENT_USER\Software\Policies\Microsoft\Office\16.0\Common\Identity /t REG_EXPAND_SZ /v basichostallowlist /d "HOSTNAME"Where HOSTNAME is the domain of your server, eg. wiki.tsnocode.com.
How to enable support in LibreOffice on Debian
Run the following commands
xdg-mime default libreoffice-writer.desktop  x-scheme-handler/ms-word
xdg-mime default libreoffice-calc.desktop  x-scheme-handler/ms-excel
xdg-mime default libreoffice-impress.desktop  x-scheme-handler/ms-powerpoint
LDAP
Basic configuration is the name of the LDAP server and domain that is binded to the application
- ldapServer
- ldapDomainDefault
All configuration options are found in: Policy#Active directory
Synchronization options
Different options for LDAP integration exists
- Validate credentials: Check username/password against LDAP
- Maintain groups: Add missing groups as defined in the LDAP
- Create missing users: Create users with correct LDAP credentials
Credential validation (1) is mandatory, while group synchronization (2) and automatic user creation (3) is optional.
- ldapAuthentication
- ldapMaintainGroupsOnLogon
- ldapCreateUsers
Groups and usersd in Tempus Serva will be marked with the LDAP path of the object. This path is also editable, so that groups or users can be mapped to other names in Tempus Serva than in the LDAP.
Failover mechanism
In case the LDAP is not responding the server can be allowed to use local application credentials:
- ldapAuthenticationFallback
The server will initially try to validate against the LDAP, after which the validation is done against the local user table. In order to allow this operation, an encrypted copy of the user password is stored on every successfull LDAP authentication. Note this behaviour is only active if the fallback authentication is enabled.
LDAP service account
In order to communicate with the LDAP server, the Tempus Serva application will need its own acount to carry out many of the synchronization operations:
- ldapUsername
- ldapPassword
No permissions except lookup rights are required for this role.
Jobnet
Jobnet v1
It's possible to upload jobs to JobNet using the tsJobnet servlet.
This site documents the interface.
Usage
Send a POST or GET-request to the servlet-endpoint "/addJob" with the required parameters as url-parameters.
If a parameter is missing, the servlet will return HTTP-CODE 403 and a message in the body, telling you what was wrong.
All fields
| Parameter | Type | Default | Required | Description |
| ApplicationDetails.ApplicationMethods.ApplyByEmail | String (email) | No | ||
| ApplicationDetails.ApplicationMethods.ApplyByLetter | Boolean | false | No | |
| ApplicationDetails.ApplicationMethods.ApplyByTelephone | String (phone-number) | No | ||
| ApplicationDetails.ApplicationMethods.ApplyOnline | String (url) | No | ||
| ApplicationDetails.Description | String | No | A short description of the job, not the full description, that is JobDetails.Description | |
| ApplicationDetails.JobContactList.JobContactType.Email | String (email) | Yes | ||
| ApplicationDetails.JobContactList.JobContactType.PersonNameStructure.PersonGivenName | String | Yes | ||
| ApplicationDetails.JobContactList.JobContactType.PersonNameStructure.PersonSurnameName | String | Yes | ||
| ApplicationDetails.JobContactList.JobContactType.Title | String | Yes | ||
| ApplicationDetails.JobContactList.JobContactType.HidePhoneNumbers | Boolean | true | Yes | |
| ApplicationDetails.JobContactList.JobContactType.TelephoneNumberStructure.MobileNumber | String (phone-number) | No | ||
| ApplicationDetails.JobContactList.JobContactType.TelephoneNumberStructure.PrimaryNumber | String (phone-number) | No | ||
| ApplicationDetails.JobContactList.JobContactType.TelephoneNumberStructure.SecondaryNumber | String (phone-number) | No | ||
| ApplicationDetails.JobContactList.JobContactType.TelephoneNumberStructure.Telefax | String (phone-number) | No | ||
| ApplicationDetails.Referral | String | No | ||
| HiringOrganizationDetails.AddressStructure.CountryCode | String | Yes | ||
| HiringOrganizationDetails.AddressStructure.FloorIdentifier | String | No | ||
| HiringOrganizationDetails.AddressStructure.MunicipalityId | Integer | Yes | ||
| HiringOrganizationDetails.AddressStructure.MunicipalityName | String | Yes | ||
| HiringOrganizationDetails.AddressStructure.PostalCity | String | Yes | ||
| HiringOrganizationDetails.AddressStructure.PostalCode | String | Yes | ||
| HiringOrganizationDetails.AddressStructure.StreetBuildingIdentifier | String | Yes | ||
| HiringOrganizationDetails.AddressStructure.StreetName | String | Yes | ||
| HiringOrganizationDetails.AddressStructure.SuiteIdentifier | String | No | ||
| HiringOrganizationDetails.BranchCode | Integer | Yes | ||
| HiringOrganizationDetails.BranchDescription | String | Yes | ||
| HiringOrganizationDetails.Contact.Email | String (email) | No | ||
| HiringOrganizationDetails.Contact.PersonNameStructure.PersonGivenName | String | Yes | ||
| HiringOrganizationDetails.Contact.PersonNameStructure.PersonSurnameName | String | Yes | ||
| HiringOrganizationDetails.Contact.Title | String | No | ||
| HiringOrganizationDetails.Contact.PrimaryNumber | String (phone-number) | No | ||
| HiringOrganizationDetails.Contact.SecondaryNumber | String (phone-number) | No | ||
| HiringOrganizationDetails.Contact.Telefax | String (phone-number) | No | ||
| HiringOrganizationDetails.CvrNumber | String | No | ||
| HiringOrganizationDetails.Name | String | Yes | ||
| HiringOrganizationDetails.PNumber | String | No | ||
| HiringOrganizationDetails.Url | String | No | ||
| JobAdDetails.JobPublishDates.LastModifiedDate | String | No | ||
| JobAdDetails.JobPublishDates.PublishEndDate | String | Yes | Has to be after PublishStartDate, but at the longest 8 weeks after | |
| JobAdDetails.JobPublishDates.PublishStartDate | String | Yes | Has to be today or after | |
| JobAdDetails.Logo | String (base64) | No | max. 200x135px / 100KB | |
| JobAdDetails.PostedBy.Email | String (email) | No | ||
| JobAdDetails.PostedBy.PersonNameStructure.PersonGivenName | String | Yes | ||
| JobAdDetails.PostedBy.PersonNameStructure.PersonSurnameName | String | Yes | ||
| JobAdDetails.PostedBy.Title | String | No | ||
| JobAdDetails.PostedBy.ContactGuid | String | No | ||
| JobAdDetails.PostedBy.PrimaryNumber | String (phone-number) | No | ||
| JobAdDetails.PostedBy.Telefax | String | No | ||
| JobAdDetails.PostedBy.UserRid | String | No | ||
| JobAdDetails.Type | String | Normal | No | Has to be one of "WageSubsidy", "HotJob", "Normal", "SpringStone", "Flexjob", "EarlyRetirement", "JobRotation", "EarlyRetiree", "CompanyInternship", "NormalAndEarlyRetiree", or"NormalAndEarlyRetireeWithHotJob" |
| JobDetails.AuthorityId | Integer | 0 | No | |
| JobDetails.AuthorityPhoneNumber | String (phone-number) | No | ||
| JobDetails.Classification.EmploymentType | String | PermanentJob | No | Has to be "PermanentJob" or "LimitedPeriod" |
| JobDetails.Classification.IsEuresJob | Boolean | false | No | |
| JobDetails.Classification.IsPublicSectorJob | Boolean | false | No | |
| JobDetails.Classification.IsWorkInDenmarkJob | Boolean | false | No | |
| JobDetails.Description | String | Yes | The description of the job. If it contains html (subset) it has to be wrapped in <![CDATA[]]> | |
| JobDetails.DriversLicences | Comma-List | No | Required drivers licenses to apply for the job. Can be any combination of A1, A, B, BE, C, CE, D, DE, A10, AMa, AMb, A2, C1, D1, C1E, D1E, Taxi, Traktor, Truck, BusErhverv, DigitalFartskriver, EUGodsErhverv and EUBusErhverv, seperated by a comma | |
| JobDetails.HidePhonenumbers | Boolean | false | No | |
| JobDetails.IsAnonymousEmployer | Boolean | false | No | |
| JobDetails.IsDisabilityFriendly | Boolean | false | No | |
| JobDetails.JobDates.ApplicationDeadlineDate | String (date) | Yes | ||
| JobDetails.JobDates.EmploymentDate | String (date) | No | ||
| JobDetails.JobDates.StartAsSoonAsPossible | Boolean | false | No | |
| JobDetails.JobLocation.Address.CountryCode | String | Yes | ||
| JobDetails.JobLocation.Address.FloorIdentifier | String | No | ||
| JobDetails.JobLocation.Address.MunicipalityId | Integer | Yes | ||
| JobDetails.JobLocation.Address.MunicipalityName | String | Yes | ||
| JobDetails.JobLocation.Address.PostalCity | String | Yes | ||
| JobDetails.JobLocation.Address.PostalCode | String | Yes | ||
| JobDetails.JobLocation.Address.StreetBuildingIdentifier | String | Yes | ||
| JobDetails.JobLocation.Address.StreetName | String | Yes | ||
| JobDetails.JobLocation.Address.SuiteIdentifier | String | No | ||
| JobDetails.JobLocation.NoLocalBusinessAddress | Boolean | false | No | |
| JobDetails.NumberOfPositions | Integer | 1 | No | |
| JobDetails.OccupationConceptUri | String (JobnetConceptUri) | Yes | ||
| JobDetails.Schedule.DailyWorkTime.Day | Boolean | false | No | |
| JobDetails.Schedule.DailyWorkTime.Evening | Boolean | false | No | |
| JobDetails.Schedule.DailyWorkTime.Night | Boolean | false | No | |
| JobDetails.Schedule.DailyWorkTime.Weekend | Boolean | false | No | |
| JobDetails.Schedule.WeeklyWorkTimeTypes | String | FullTime | No | Has to be PartTime or FullTime |
| JobDetails.Schedule.WorkHour.Max | Integer | No | Expected maximum of hours of work, a week, if PartTime | |
| JobDetails.Schedule.WorkHour.Min | Integer | No | Expected minimum of hours of work, a week, if PartTime | |
| JobDetails.Title | String | Yes | The title being hired for |
Notes
At least one application method (ApplicationDetails.ApplicationMethods) has to be set.
At least one phonenumber has to be set for job-contact (ApplicationDetails.JobContactList.JobContactType.TelephoneNumberStructure).
If schedule (JobDetails.Schedule.WeeklyWorkTimeTypes) equals "FullTime", workhours (JobDetails.Schedule.WorkHour.Min and JobDetails.Schedule.WorkHour.Max) can't be set.
JobDetails.Schedule.WorkHour.Min has to be lower than JobDetails.Schedule.WorkHour.Max and between 0 and 36.
JobDetails.Schedule.WorkHour.Max has to be greater than JobDetails.Schedule.WorkHour.Min and between 1 and 36.
If schedule (JobDetails.Schedule.WeeklyWorkTimeTypes) Equals "PartTime", workhours (JobDetails.Schedule.WorkHour.Min and JobDetails.Schedule.WorkHour.Max) have to be set.
JobnetConceptUri
Jobs uploadet to JobNet require the parameter JobDetails.JobLocation.OccupationConceptUri to be set to a valid OccupationConceptUri.
A wrapper has been made for this, it is part of the JobNet servlet.
Usage
Send a POST or GET-request to the servlet-endpoint "/getOccupations".
If an error occurs, the servlet will return HTTP-CODE 403 or 500 and a message in the body, telling you what was wrong.
If the request is successful a JSONArray wil be returned.
Invalid OccupationConceptUri's will be returned, because of backwards-compatibility. Filter these via the "valid" attribute.
Sample
[
    {
        "valid": false,
        "description": "Borearbejdere (sten) betjener boremaskinen, der borer huller i stenblokke. De behandler granit, sandsten, marmor og skifer i overensstemmelse med specifikationerne.",
        "label": "borearbejder - sten",
        "uri": "http://data.star.dk/esco/occupation/2fbdc3fa-aeab-4e45-bccf-9421b84c687f"
    },
    ...
]
Link to QR codes
You can use our online QR coder to convert links to mobile phone QR codes.
Add the link in question as the request string (after the ?)
Example:
https://omega.tempusserva.dk/qr/encode?https://docs.tsnocode.com/books/standard-integrations/page/link-to-qr-codesAs of version 11524 this servlet is now built into the platform and can be used like this:
qr?https://docs.tsnocode.com/books/standard-integrations/page/link-to-qr-codesTransforming access tokens to QR codes
Assuming you allready have an interface for a solution, you can add a button to build QR codes containing the tokens for selected elements.
First create a field of the type Button: Script execution.
Then set up the JS to handle open a window with a code:
let url = "main?command=dk.p2e.blanket.codeunit.common.PagePublicTokenBuilderQR&interface=foobar&SagID=257&DataID=" + DataID;
window.open(url, "QR code", "width=300,height=300,menubar=no,resizable=no,toolbar=no,location=no");
In the above you will need to change
- SagID
- interface
Oauth2 authentication
Understanding Oauth 2
Oauth authentication will put icons on the login page for fast and easy SSO wth multiple vendors.
The user will be authenticated if the email matches between the provider and the Tempus Serva user.
The following providers are supported.
- Azure
- ADFS
- WordPress (Via plugin)
From version 6191 it is possible to setup TS to create a new account, if a user signed in with oauth/sso and wasn't found among the existing users.
To do this enable the configuration oauthCreateNewUsersAllow and set their initial GroupID in the configuration oauthNewUserGroup.
Setting up SingleSignon
Before going into the detailed configuration please make sure https/SSL is enabled.
Set the following configurations to true
- securitySslLogin
- securitySslPages
Next activate service icons on the login page
- oauthLoginDisplay
Google Oauth
Using an existing Google account , go to the [credentials section].
First setup Oauth messages in the Oauth conscent section
- Logo, privacy policies etc. are not required but make things look better
- Note that domain authentication is not required
Next setup setup credentials
LinkedIn Oauth
Copy credentials to
- oauthLinkedinClient
- oauthLinkedinSecret
Enable
- oauthLinkedinAllow
Callback URL
Facebook Oauth
Copy credentials to
- oauthFacebookClient
- oauthFacebookSecret
Enable
- oauthFacebookAllow
Callback URL
Azure Oauth
Copy credentials to
- oauthAzureTenant
- oauthAzureClient
- oauthAzureSecret
Enable
- oauthAzureAllow
Callback URL
ADFS Oauth
Copy credentials to
- oauthAdfsServer
- oauthAdfsClient
Enable
- oauthAdfsAllow
Callback URL
WordPress
- Install and activate the plugin
- Enable the Oauth-server (Oath Server -> Settings -> Enable Oauth Server)
- Create a new client (Oauth Server -> Clients -> Add New Client)
- Give it a descriptive name
- Add the Redirect URI (Should be something like:
https://[ts-hostname]/[ts-instance]/SignInWP) - Assign it admin rights
- Save it
- Copy credentials to Configurations
- oauthWPClient
- oauthWPSecret
- Input wordpress domain/link to Configuration (no trailing /)
- oauthWPHost
- Enable Configuration
- oauthWPAllow
Outlook calendar
Exporting data items as calendar entrys
How to display an export to calendar on each data item
Note that
- a link will be displayed in the body of the message unless hidelink is present
- use normal references for fields (without brackets and no constants)
- the SagID value must match that of the solution in question
Example configuration
exportcard?SagID=1&DataID=[DataID]&title=COMPANY&content=AGENDA&from=MEETINGDATE&minutes=MINUTES
exportcard?SagID=1&DataID=[DataID]&title=COMPANY&from=MEETINGDATE&minutes=60
Pentaho
Installing Pentaho CE
https://sourceforge.net/projects/pentaho/
Setting up Mondrian
https://rpbouman.blogspot.com/2016/03/need-mondrian-war-checkout-xmondrian.html
https://github.com/rpbouman/xmondrian
NOT https://sourceforge.net/projects/mondrian/