TS hosting instructions
Internal setup instructions
An installation includes:
- Server installation
- Domain name
- SSL certificate
- Server monitoring
- Remote backup
- Scaleway server setup
- AWS Server setup
- Set up domain name
- Set up SSL/TLS/HTTPS
- Set up remote backup
- Set up monitoring
- Basic setup
- Cloning an instance
- EC2 server recovery
- Local development environment tutorial
- Satellite servers
- Setting up a satellite server
- Synchronizing master and satellite
- Changes to master server
- Changes to slave server
- Testing the setup
- Migrating an instance
- Remote debugging in Netbeans
- Change login session duration
- Disable ssh password login
- Proxies and policies
Scaleway server setup
Installing the server
- Log into the Scaleway account
- Navigate to Instances
- Click the "+ Create Instance" button
- Choose an appropriate zone
- Choose an appropriate server size
- Choose a supported OS (CentOS Stream 9)
- Give the server a useful name
- Add tags
- Common ones:
- customer-facing
- partner
- internal
- ts-cloud
- ts-infrastructure
- Common ones:
- Optional: Add a data-volume
- Reserve a dedicated (public) IPv4 address
- Remove IPv6 option
- Click Create
- SSH into the server and install the CLI
AWS Server setup
Installing the server
- Log into the AWS account
- Choose an appropriate zone, eg. eu-north-a (Stockholm)
- Navigate to the EC2-dashboard
- Launch a new instance
- Give it a useful name
- Change the Instance type
- Select a keypair that you have access to
- Select "Select existing security group", select:
- WebAccess
- default
- DefaultSSHAccess
- Optional: Adjust storage
- Launch the isntance
- Reserve a dedicated (elastic) IP address
- Click Allocate elastic IP address
- Click Allocate
- Associate the elastic IP
- Find the IP in the list, click it
- Under Actions choose Associate elastic IP address
- Find the instance you just launched
- SSH into the server and install the CLI
- Optionally run:
ts developer-access
- Optionally run:
Set up domain name
- Sign in to the Cloudflare Dashboard
- Select the domain, usually tsnocode.com
- Select DNS in the side menu
- Click Add Record
- Type: A
- Name: the subdomain part, eg. alpha, if the full domain is alpha.tsnocode.com
- IPv4 address: IP of the server
- Disable Proxy
- Add a comment (customer and hosting provider)
- Click Save
Set up SSL/TLS/HTTPS
- SSH into the new server
- Ensure that the server has been fully installed, and an instance has been installed as well
- To install run: ts install
- Solution 1, SSL offload using nginx
- Install nginx, run: ts install-proxy
- Setup a proxy, run: ts setup-proxy
- Solution 2, SSL connector in Tomcat
- Run: ts install-routing
- Install certbot, run: ts install-ssl
- When the install finishes, select Y, or run: ts setup-ssl
- Follow the prompts
Old implementation
The following is the old, manual, way of installing SSL certs.
Tomcat 7 automatic installation
Using the TS commandline tools, you specify the domain and your email
tsinstallssl.sh server.acme.com sslresponsible@acme.com
After a couple of minutes you will be rquired to enter the domain an email again, and accept the terms of service
Tomcat 7 manual installation
Install and configure letsencrypt
Download an build certbot (letsencrypt client)
sudo yum -y install python27-devel git (deprecated)sudo yum -y install python36 python36-pip
sudo yum -y install git-all
sudo git clone https://github.com/letsencrypt/letsencrypt /opt/letsencrypt
/opt/letsencrypt/letsencrypt-auto --debug --agree-tosCreate a config file
sudo touch /etc/letsencrypt/config.ini
sudo chmod 777 /etc/letsencrypt/config.ini
sudo echo "rsa-key-size = 4096" >> /etc/letsencrypt/config.ini
sudo echo "email = kpe@tempusserva.dk" >> /etc/letsencrypt/config.ini
Generate PKCS12 certificate
Generate a certificate
sudo mkdir /usr/share/tomcat7/webapps/ROOT
/opt/letsencrypt/letsencrypt-auto certonly --debug --webroot -w /usr/share/tomcat7/webapps/ROOT -d letsencrypt.tempusserva.dk --config /etc/letsencrypt/config.ini --agree-tos
Convert to pkcs12 format
sudo -s
cd /etc/letsencrypt/live/letsencrypt.tempusserva.dk
openssl pkcs12 -export -out bundle.pfx -inkey privkey.pem -in cert.pem -certfile chain.pem -password pass:TempusServaSecret
chmod 755 bundle.pfx
chmod 755 /etc/letsencrypt/live
Press: ctrl + dInstall certificate in Tomcat
Edit Tomcat configuration
sudo nano /usr/share/tomcat7/conf/server.xml <Connector
protocol="org.apache.coyote.http11.Http11NioProtocol"
port="8443" maxThreads="200"
scheme="https" secure="true" SSLEnabled="true"
keystoreFile="/etc/letsencrypt/live/letsencrypt.tempusserva.dk/bundle.pfx" keystorePass="TempusServaSecret"
ciphers="TLS_ECDHE_RSA_WITH_AES_128_CBC_SHA256,TLS_ECDHE_RSA_WITH_AES_128_CBC_SHA,TLS_RSA_WITH_AES_128_CBC_SHA256,TLS_RSA_WITH_AES_128_CBC_SHA"
clientAuth="false" sslProtocol="TLS" keystoreType="PKCS12"/>
Reboot the server
service tomcat7 restartAutomated renewals
Before starting test that the renewal process works
/opt/letsencrypt/letsencrypt-auto renew --dry-runMake sure the path is accessible from cron
 sudo chmod go+x /etc/letsencrypt/archive
 sudo chmod go+x /etc/letsencrypt/live
Make a script file
sudo nano /usr/bin/tsrefreshcerts.sh.... containing the following commands
/opt/letsencrypt/letsencrypt-auto renew
cd /etc/letsencrypt/live/letsencrypt.tempusserva.dk
openssl pkcs12 -export -out bundle.pfx -inkey privkey.pem -in cert.pem -certfile chain.pem -password pass:TempusServaSecret
/usr/bin/tstomcatrestart.sh
Now add a job to the crontab
 sudo crontab -l > tempcron
 echo "0 0 1 * * /usr/bin/tsrefreshcerts.sh" >> tempcron
 sudo crontab tempcron
 rm tempcron
Problems with Amazon Linux?
In case the autorenewal process fails try updating the dependencies and pip
 sudo /opt/eff.org/certbot/venv/bin/pip2 install cryptography zope interface
 sudo /opt/eff.org/certbot/venv/bin/pip2 install --upgrade pip
 sudo rsync -avz /opt/eff.org/certbot/venv/lib64/python2.7/dist-packages/ /opt/eff.org/certbot/venv/lib/python2.7/dist-packages/
Still got problems with Amazon Linux?
In case certbot cant find the root folder try and run it manually
sudo /opt/letsencrypt/letsencrypt-auto certonlyChoose the following values when prompted
 2: Place files in webroot directory (webroot)
 <domain>
 2: Renew & replace the cert (may be subject to CA rate limits)
 /usr/share/tomcat7/webapps/ROOT/
Need manual crontab install?
Steps
- sudo crontab -e
- press INSERT
- move to bottom of file
- paste this
0 0 1 * * /usr/bin/tsrefreshcerts.sh- press ESC
- press :wq
External Certificate
Acquire certificate
Buy a certificate from a provider. Note that the max lifetime is currently 1 year, så buying a 5 year certificate only help on pricing.
https://www.ssls.com/After issuing the files you will have
- A private key - ex: movia.tempusserva.dk.pfx
- A certificate - ex: movia_tempusserva_dk_key.txt
Install certificate
1. Upload the files
2. Convert to a pfx file format
openssl pkcs12 -export -out movia.tempusserva.dk.pfx -inkey movia_tempusserva_dk_key.txt -in movia.tempusserva.dk.crtWrite the password down
Check alias if needed
openssl pkcs12 -nokeys -info -in movia.tempusserva.dk.pfx -passin pass:TempusServaFTW!4. Install in tomcat Add the following code to <tomcat>\conf\server.xml
<Connector port="8443" protocol="HTTP/1.1" SSLEnabled="true" URIEncoding="UTF-8"
   scheme="https" secure="true" maxHttpHeaderSize="8192"
   maxThreads="150" minSpareThreads="25" maxSpareThreads="75"
   enableLookups="false" acceptCount="100" disableUploadTimeout="true"
   keystoreFile="/mnt/sda/certs/movia.tempusserva.dk.pfx" keystorePass="TempusServaFTW!" keystoreType="PKCS12"
   clientAuth="false" sslProtocol="TLS" sslEnabledProtocols="TLSv1.2"
   ciphers="TLS_ECDHE_RSA_WITH_3DES_EDE_CBC_SHA,
            TLS_RSA_WITH_AES_128_CBC_SHA,
            TLS_ECDHE_RSA_WITH_AES_128_CBC_SHA,
            TLS_RSA_WITH_AES_128_CBC_SHA256,
            TLS_RSA_WITH_AES_128_GCM_SHA256,
            TLS_ECDHE_RSA_WITH_AES_128_CBC_SHA256,
            TLS_ECDHE_RSA_WITH_AES_128_GCM_SHA256,
            TLS_RSA_WITH_AES_256_CBC_SHA,
            TLS_ECDHE_RSA_WITH_AES_256_CBC_SHA,
            TLS_RSA_WITH_AES_256_CBC_SHA256,
            TLS_RSA_WITH_AES_256_GCM_SHA384,
            TLS_ECDHE_RSA_WITH_AES_256_CBC_SHA384,
            TLS_ECDHE_RSA_WITH_AES_256_GCM_SHA384"
   compression="on" compressionMinSize="2048" nocompressionUserAgents="gozilla, traviata"
       compressableMimeType="text/html,text/xml,text/plain,application/xml"
/>
5. Restart the server
Problems with wrappers
The usage of wrappers can result in SSL warnings.
If your solution is depending on the use of Wrappers, please tjeck the following
- All style, script and image references are made with HTTPS
- No referenced stylesheets depends on images using HTTP
If the wrapper cannot be transformed from HTTP to HTTPS, referenced ressources should be copied to the server
- Stylesheets copied to TS stylesheet
- Images downloaded and copied to the media library
After changes are made remmeber to flush caches: Both Chrome and IE sometimes caches longer than expected.
Set up remote backup
Client server setup
- Log into server via SSH
- Ensure that the backup ssh-certificate is installed
- On old servers running Legacy CLI
- Run: tsrefreshscripts.sh
- Run: tsbackupcertificates.sh
- Check if cronjobs are missing: sudo crontab -l
- Run: tsinstallcronjobs.sh
- On newer servers running Current CLI
- Run: ts update-script
- Run: ts backup-database-rsync
- On old servers running Legacy CLI
- Ensure that port 22 is open for TCP trafic from the backup server IP
- Run the license report service manually, if it has never been executed
Backup server setup
- Ensure that the server is present in the server-list on the support-server
- Check the Backup option
- Set a unique name for the backup
- Only lowercase and a-z
- Save
Validate backup
- Wait to 24h passes
- Check the server-record on the support-server
- Ensure that a backup size is recorded and last-backup is within the last 24 hours
Set up monitoring
- Log in to UptimeKuma
- Clone an existing monitor group in the Customers group
- Clone an existing not "- Healthy" monitor
- Change Friendly Name
- Change URL
- Change Monitor Group
- Clone an existing "- Healthy" monitor, if hosting is not shared
- Change Friendly Name
- Change URL
- Change Monitor Group
- Tjeck the monitor is working
Basic setup
All the following canges are carried out in the Tempus Serva designer
Company logo
- Upload you logo file via Ressources > Media files
- Show the logo after upload
- Copy the URL of image
- Add to stylesheet via Ressources > Stylesheet
.logo {
  background: url(https://alpha.tempusserva.dk/TempusServa/media/logo.1.svg) no-repeat !important;
}
Company colors
Edit the stylesheet via Ressources > Stylesheet
- themePrimary
- themeSecondary
- themeTeritary (optionally)
Next edit the graph colors in Modules > Configurations
- diagramColor
- diagramColorTextAxis (optionally)
Setting up outbound emails
In the designer edit the following Modules > Configurations
- smtpServer
- smtpUsername
- smtpPassword
- smtpTestEmail
Cloning an instance
Connecting to the server
First you must access the commandline on the system in question. This is done using a certificate and the Putty program.
- Get a certificate private key from an existing admin user
- Install Putty on your machine (alternative WinSCP)
- Set up the profile in Putty
- Set hostaname = {server IP or domain name}
- Set Category > Connection > Data > Auto login username = ec2-user
- Set Category > Connection > SSH > Auth > Credentials > Private key file authentication = {private file location}
- Session > Save
Test you can connect to the server.
Note: Connection will fail if you try connecting from an IP that is not whitelisted by the TS server team
Cloning the system
Copy an instance
- Run: ts clone-app
- Define source name
- Define name of new instance
Validate after 2 mins that the instance is running
Option: Change configurations
Some server settings are more appropriate for demo/test systems.
Consider setting
- Backend > Modules > Configuration
- smtpTestMode = false
- serviceAutostart = false
EC2 server recovery
Recovery procedure without database backup
Changes in AWS
- Make a snapshot of the running server
- Make a volume from the snap shot
- Name the volume: RESTORE COPY
- Create a NEW server
- Attatch the RESTORE COPY to NEW server on /dev/sdf
Connect to new server
- Install TS client tools
- ts quick-install
- ts stop-webserver
- ts stop-database
- mkdir /mnt/oldroot
- sudo mount /dev/nvme1n1p1 /mnt/oldroot
- sudo rm -r /var/lib/mysql
- sudo cp -r /mnt/oldroot/var/lib/mysql /var/lib
- ts start-database
- mysql -uroot -p -e "UPDATE applive.systempolicy SET PolicyValue='false' WHERE PolicyName LIKE 'securitySsl%'"
- sudo rm -r /mnt/sda/*
- sudo cp -r /mnt/oldroot/usr/tempusserva/sda/* /mnt/sda/
- sudo chmod 777 -R /mnt/sda/files
- sudo cp /mnt/oldroot/usr/share/tomcat8/conf/Catalina/localhost/* /usr/share/tomcat8/conf/Catalina/localhost
- ts start-webserver
- Ensure server is running
Changes in AWS
- Stop NEW server
- Detatch RESTORE COPY
- Stop OLD server
- Deassociate IP from OLD server
- Associate IP to NEW server
- Start NEW server
Connect to new server
- ts install-ssl
- mysql -uroot -p -e "UPDATE applive.systempolicy SET PolicyValue='true' WHERE PolicyName LIKE 'securitySsl%'"
- ts restart-webserver
Steps is using S3 filesystem
- Server_maintenence#Moving_files_to_S3_storage
- Step: Add IAM role to server
- Step: Install the mountpoint
Local development environment tutorial
This tutorial's goal is to explain how to set up the TS-nocode platform and database on a Windows PC.
You will need
- TortoiseSVN
- Apache Tomcat 8.5 or 9
- Netbeans 8.2 running JDK 1.8 or newest Netbeans and a supported JDK
- MariaDB 11
- Navicat for MariaDB
- npm (NPM Package Manager)
- TempusServa.war
- mariadb-java-client-3.1.4
What to do
- Create a working copy of the codebase via TortoiseSVN (see https://tortoisesvn.net/docs/release/TortoiseSVN_en/tsvn-quick-start.html)
- Start MariaDB in Windows Services
- Create a new connection in Navicat with the following parameters: host: localhost, port:3306, username:root. Connection name doesn't matter.
- Create three new databases in Navicat; tsbase, tslive, and tstest. Configuration should be left as default.
- Start Apache Tomcat in Windows Services.
- Put TempusServa.war in Tomcat 8.5/webapps. A folder with the name TempusServa should be generated automatically after a couple of seconds.
- In TempusServa/sql are some sql files which have to be run on each of the tree databases in navicat in the following order:
- ts_base_restore -> appbase
- ts_live_create -> applive
- ts_test_create -> apptest
- If the sql files fail to run properly you may have to add the following to my.ini in MariaDB 11.0/Data:
(Restart MariaDB in Windows Services to activate the new settings)max_allowed_packet = 1G innodb-default-row-format = dynamic innodb-lock-wait-timeout = 1200 innodb_log_file_size = 2G innodb_log_buffer_size = 1G innodb_strict_mode = 0 - Create a new file TempusServa.xml in Tomcat 8.5\conf\Catalina\localhost
- Both context.xml in your working copy in sfwServlets\web\META-INF and TempusServa.xml should look like this:
Remember to add your own root password to the xml's.<?xml version="1.0" encoding="UTF-8"?> <Context antiJARLocking="true" path=""> <Resource name="jdbc/TempusServaLive" auth="Container" type="javax.sql.DataSource" maxActive="80" maxIdle="30" maxWait="2000" removeAbandoned="true" removeAbandonedTimeout="60" logAbandoned="true" validationQuery="SELECT 1" validationInterval="30000" testOnBorrow="true" username="root" password="*yourPassword*" driverClassName="org.mariadb.jdbc.Driver" url="jdbc:mariadb://localhost:3306/tslive?autoReconnect=true&useUnicode=true&characterEncoding=UTF-8" /> <Resource name="jdbc/TempusServaTest" auth="Container" type="javax.sql.DataSource" maxActive="5" maxIdle="3" maxWait="10000" logAbandoned="true" validationQuery="SELECT 1" validationInterval="30000" testOnBorrow="true" username="root" password="*yourPassword*" driverClassName="org.mariadb.jdbc.Driver" url="jdbc:mariadb://localhost:3306/tstest?autoReconnect=true&useUnicode=true&characterEncoding=UTF-8" /> </Context>
- Insert mariadb-java-client-3.1.4 in Tomcat 8.5\lib.
- In Netbeans, open the following projects and build them afterwards: p2eShared, p2eSolution, p2eTemplate, sfwServlets.
- In Netbeans Projects view, run debug file on sfwServlets\Source Packages\dk.p2e.blanket\live.java.
- login/password is admin/TempusServa1234.
- Login might not work due to being redirected to a https connection if securotyssllogin and -pages in the systempolicy table in tslive are not set to false.
- If views are missing, go to the backend and then Modules -> Admin services -> Cache control -> Reload policies. Then Rebuild artifacts -> Rebuild views. This should create the missing views in the database.
Accessing the backend
If you start the server from Netbeans, you will not have access to the backend. To do this you will need to start the server by running Tomcat in Windows Services. A good idea is to have both servers running at the same time on two different ports.
- To change the used port in Tomcat go to Apache Software Foundation\Tomcat 8.5\conf\Server.xml.
- Set the port to for example 8081 at the following spots in the xml file:
(Tomcat will have to be restarted for the changes to take effect)<Connector port="8081" protocol="HTTP/1.1" connectionTimeout="20000" redirectPort="8443" maxParameterCount="1000" /> - To access the server from Tomcat go to http://localhost:8081/TempusServa
Satellite servers
Setting up a satellite server
The following guide explains how a master / satelite server is set up.
It is assumed that you allready have the MASTER server running.
basic installation Linux
First do a normal TS installationon the SATELITE server
Add access to the MySQL database on the SATELITE server
 iptables -A INPUT -i eth0 -p tcp -m tcp --dport 3306 -j ACCEPT
 sudo /etc/init.d/networking restart
Test access from the MASTER server
telnet sateliteServer 3306
Synchronizing master and satellite
Initially the servers should look alike so it is much easier to stream all data across
On the SATELITE server dump configutations to a file
mysqldump -uLocalUser -pLocalPW --tables tslive.systempolicy > policy.sql
On the MASTER server stream all data
mysql -uLocalUser -pLocalPW > mysql -uRemoteUser -pRemotePW
On the SATELITE server reload configutations
mysql -uLocalUser -pLocalPW --tables tslive.systempolicy < policy.sql
Changes to master server
Changes to slave server
Testing the setup
Migrating an instance
How to migrate a running instance to a new server, with a message on the old server about the migration.
- Set up a new server (Scaleway hosting)
- Install the newest alpha release on the new server
- On the old server, if a notice about migration is wanted/needed
- Turn off tomcat
- Move the webapps folder and war-file out of the webapps folder
- Create a folder with content about the server meing migrated
- Start tomcat
- On the old server
- Move to the ROOT webapp
cd /usr/share/tomcat/webapps/ROOT - Export the database
sudo mysqldump -p [LIVE-DB-NAME] > tslive.sql
- Move to the ROOT webapp
- On the new server
- Download the sql file on the new server, to a folder with enough space
cd /mnt/sdawget [OLD-SERVER]/tslive.sql
- Fix naming in sql file, if the webapp changes name
sed -i 's/tslive/applive/g' tslive.sqlsed -i 's/tsbase/appbase/g' tslive.sqlsed -i 's/tstempusserva/tsapp/g' tslive.sql
- Turn off tomcat
- Import the sql file
mysql -p applive < tslive.sql
- Download the sql file on the new server, to a folder with enough space
- Connect to the new database
- Move sql functions if needed
- Fix policies
- applicationName
- applicationBasePath
- applicationServer
- Maybe:
- applicationIsBehindAReverseProxy
- applicationlPort
- applicationlPortSSL
- smtpTestMode
- securitySslPages
- If an update of the webapp version is not desired:
- On the old server
- Move the webapps war-file to the ROOT webapp folder
- On the new server
- Download the war-file
wget [OLD-SERVER]/TempusServa.war - Replace the war-file in the webapps folder
mv TempusServa.war /usr/share/tomcat9/webapps/app.war
- Download the war-file
- On the old server
- Start tomcat on the new server
- Test the new server
- Update DNS
- If the domain is still the primary domain
- Setup SSL
- If the domain is no longer the primary domain
- Update SSL cert with old domain
- Expand nginx setup to include old domain
- If the webapp changed name
- Add a redirect app
ts install-redirectapp
- Add a redirect app
- If the domain changed
- Add a link to the new domain in the "migration webapp" on the old server
Sample migration webapp
index.jsp
Just a basic page telling the user that the server is unavailable.
<html>
  <head>
    <title>Sorry, we are migrating the server</title>
  </head>
  <body>
    <h1>Sorry, the server is currently unavailable</h1>
    <p>The server is currently being migrated, please check back later</p>
  </body>
</html>
WEB-INF/web.xml
Remaps all requests to the server, to the index.jsp file.
<?xml version="1.0" encoding="UTF-8"?>
<web-app version="2.4" xmlns="http://java.sun.com/xml/ns/j2ee" xmlns:xsi="http://www.w3.org/2001/XMLSchema-instance" xsi:schemaLocation="http://java.sun.com/xml/ns/j2ee http://java.sun.com/xml/ns/j2ee/web-app_2_4.xsd">
        <display-name>Redirect TempusServa</display-name>
        <servlet>
                <servlet-name>index</servlet-name>
                <jsp-file>/index.jsp</jsp-file>
        </servlet>
        <servlet-mapping>
                <servlet-name>index</servlet-name>
                <url-pattern>/*</url-pattern>
        </servlet-mapping>
</web-app>
Remote debugging in Netbeans
How to enable debuggning in netbeans on a remote server, to enable break points.
The server
Enable remote debugging in Tomcat.
Edit the service file
sudo nano /etc/systemd/system/tomcat[VERSION].serviceCopy the "CATALINA_OPTS" line and comment the old one out
Add the following add the end of the line (before the ending ping)
-XX:+UseParallelGC -Xdebug -Xrunjdwp:transport=dt_socket,address=*:9999,server=y,suspend=nSave and exit nano
Reload the service
sudo systemctl daemon-reloadRestart tomcat
ts restart-webserverEnsure that a process now is listening on port 9999
ss -lntuOpen port 9999 in the firewall using the IaaS providers interface
Netbeans
Ensure that you are running the same version of the software as the server, otherwise the break points wont make sense.
Attatch to the remote server
Select "Debug" and "Attach Debugger..."
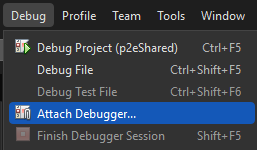
Input the host and port 9999
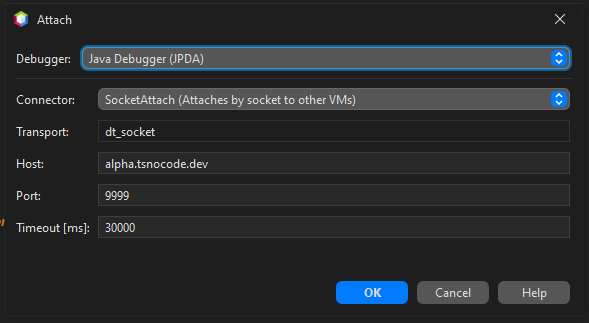
Click OK
Find the "Debugger Console", normally in the bottom of the window, in the "Output" tab.
The console should read "User program running"
Try adding a break point and see if it works
Change login session duration
To increase the number of minutes a session lasts do the following.
Warning!
This change affects all instances on a server!
First, update the tomcat configuraion
sudo nano /usr/share/tomcat/conf/web.xmlSecond, find the following config and adjust acordingly
The attribute is defined in minutes.
<session-config>
  <session-timeout>30</session-timeout>
</session-config>
Third, restart tomcat
ts restart-webserverFourth, update the policies on the instance.
Update sessionLifetimeMinutes and sessionLifetimeMaximum.
Disable ssh password login
Add a sshd config file with the following content
sudo nano /etc/ssh/sshd_config.d/99-ts.confChallengeResponseAuthentication no
PasswordAuthentication no
UsePAM noReload the SSH daemon
sudo systemctl reload sshdWARNING!
Now you are no longer able to create new session to that server!
Remember to add your ssh certificate before closing the session!
Proxies and policies
This page tries to show how to configure a couple of central policies, based on how TS is hosted.
Tomcat on port 80/443
When running tomcat directly on port 80/443, the following policies should be set.
| Policy | Value |
| applicationIsBehindAReverseProxy | false |
| applicationIsHiddenBehindAReverseProxy | false |
| applicationlPort | 80 |
| applicationlPortSSL | 443 |
| securitySslPages | Depends on if SSL is enabled (recommended) |
| applicationServer | A domain pointing at the server |
This was the default setup up untill 2025-Q2.
This illustration shows how the traffic is routed.

Behind a proxy (nginx)
When running tomcat behind a reverse proxy (eg. nginx), the following policies should be set.
| Policy | Value |
| applicationIsBehindAReverseProxy | true |
| applicationIsHiddenBehindAReverseProxy | false |
| applicationlPort | 80 |
| applicationlPortSSL | 443 |
| securitySslPages | Depends on if SSL is enabled (recommended) |
| applicationServer | A domain pointing at the server |
This is the default setup as of 2025-Q2.
It helps when running SSL/TLS and multiple/changing domains.
This illustration shows how the traffic is routed.

Hidden behind a proxy
When hiding the webapps hosted by tomcat behind a reverse proxy (eg. nginx), the following policies should be set.
| Policy | Value |
| applicationIsBehindAReverseProxy | true |
| applicationIsHiddenBehindAReverseProxy | true |
| applicationlPort | 80 |
| applicationlPortSSL | 443 |
| securitySslPages | Depends on if SSL is enabled (recommended) |
| applicationServer | The domain pointing at the instance |
This setup also requires that the context file for the given webapp is modified.
The following attributes have to be added to the Context opening tag.
useRelativeRedirects="false" sessionCookiePath="/"All of this is handled by the ts script.
This is used for shared hosting, where multiple domains are pointing to the same server, as to not expose other installations/customers.
This illustration shows how the traffic is routed.
