Features
A list of short descriptions of all the features the platform has
- Access Control
- Blocks
- External access
- Multi tenancy
- Permissions
- Understanding access control
- User Cloning
- User Profile
- Accessibility
- AI
- Communication
- Compliance
- Dashboards
- Data handling
- Advanced input forms
- Archived data
- Cloning records (Copy/Paste)
- Data reports
- Duplicate prevention
- File management
- Personal views
- QR and NFC actions
- Questionnaires
- Recent Items
- Relational database
- Searching
- Status level dependencies
- Using Views
- Viewing and editing data
- Importing and exporting data
- Integrations
- Search indexing
- Security
- Bruteforce
- Compliance built-in
- Compliance external
- Data restrictions
- Encryption
- Security baseline
- Security built-in
- Security external
- Single sign-on
- Services
- Static content pages
- Statistics
- Status based workflow
- Styling
Access Control
How permissions work
Blocks
Blocks are permission "groups" for fields, ensuring that permissions only have to be set once for each "type" of information.
Permissions in a solution point to fields via the block related to the field.

External access
It's possible to grant external users access to very limited parts of the system.
This is done using webinterfaces and time based tokens.
One way this feature can be used to grant external (anonymous users) access to input data, eg. support tickets or applications.
Another way this feature can be used is to grant external (anonymous users) access to update a specific record in a specific status.
Authenticating external users
An authentication flow can be added to the external access.
This is especially useful when an external user accesses sensitive information.
For external authentication the TS NoCode Platform supports MitID.
Multi tenancy
Usages
TS has built multi-tenancy support allowing to build segregated applications for multiple parties, while still having users working across organizational units.
Data in the system can be handled in different ways
- Owned by a single group of users
- Shared resource across groups (often readonly)
- Hidden resource (templates etc.)
Essentially this feature is just one of the ways Advanced permissions can be configured.
SAAS onboarding
In TS it is quite easy to build SAAS application, because the onboarding can be fully automated.
The process includes
- User signup form
- Optionally accept from administrators
- Optional: Contract
- Generate and send contract
- Digital signing of contract
- Profile creation
- User and group creation
- Welcome information
Context switching
Users not belonging to a tenant group will sometimes need to impersonate one.
By clicking the context swtcher component, the system start to behaving as if that user was a tenant of that group.
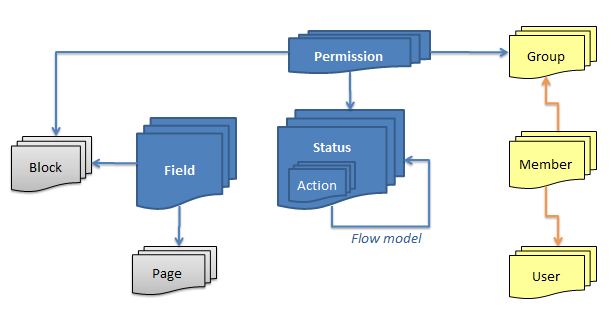
Permissions
Permissions tie together
- Groups
- Blocks (optional)
- Status (optional)
Permissions are stackable, so if higher permissions are given through one group, they will override lower permissions from other groups.
The exception is the usage of the DENY permission, which actually works in reverse: A single of the users groups with a deny permission, will supersede all other permissions.
Understanding access control
Usages
TS are based on a principle of building ONE application for MANY users.
Instead of building and maintaining multiple user interfaces, rules declarations restrict what a user can do
- What fields are available
- When records are available
- Whet records are available
Practically any set of rules can be built combining Field access and Data ownership.
Access policies
The basic Access policies controls the users access to
- Which Fields are available
- Which Status can be accessed
Permission policies stack together and include
- User group
- Field group (optional)
- Status (optional)
This allows for many combination usecases such as
Let Managers READ all data anytime
Let Managers EDIT the pricing when Status is Draft
Let Customers READ all data when Status is Order delivered
Let Administrators EDIT anything anytime except Pricing
Data ownership
Data ownership will restrict which record in an entity the user can see.
Different access restrictions exists
- Group membership (aka Exclusive groups)
- Personal record
- Access control lists
- Named users
- Named groups
Classic Multi tenancy is built by utilizing group data ownership.
Note: Depending on the setup the server can run with single or multiple Exclusive groups.
Other access controls
Many other components in the platform have configuration options to make them available to a single group
User Cloning
This will allow you to create other users, with the same permissions as yourself.
In the user creation process, you will be granted the option to define which of your own group memberships, should be copied to the new user. The user will automatically receive an email invitation, along with a randomly generated password.
Note that
- Special properties like 'User creator/editor' or 'Administrator' are never copied.
- Any Exclusive groups that you belong too, are always copied to the new user.
How to activate this feature
- User must have the User creator/editor property set
User Profile
This personal function allow you to change your password or personal contact details.
ARTICLE WRITING IN PROGRESS ...
Accessibility
Internationalization
TS supports multiple languages in the same solutions.
Out of the box includes Danish and English, but it is easy to add additional languages,
The following elements in the TS No-code Platform may have separate language settings
- Standard GUI elements
- Solution specific elements
Instructions
Enabling I18N will allow users to select their language or set it on their user profile
- Designer > Modules > Configuration > languageUseI18N = true
Multi-language solutions
Options include
- Field names
- Lookup values
- etc.
The languages are controlled through: Solution > [SOLUTION] > Wizard > Internationalization
Translations should be prefixed with the desired language code
en:This is the english translation
ge:Dies ist der Englisch-Übersetzung
Each translation should be separated by a new line. long texts can be split into multiple lines, that may or may not be handled with linebreaks.
Note that the general GUI and solution elements are handled independently, and are not required by each other.
Adding custom languages
Options include
The languages are controlled through: Designer > Resources > Language
Translation checklist
- Enable server I18N: "Modules" > "Policies" > languageUseI18N = true
- Enable solution: [solution] > "Advanced"
- Enable property: "Use I18N"
- Set native language: "Default language"
- Enter values: "Translate"
WCAC
See Compliance
AI
AI Charts
Use DataWeaver to ask an AI questions about your data, to generate graphs or list, that can be used in dashboards.
AI Conversion
Usage
Ever stood with a large amount of unstructured documents, wanting to convert them into a structured database.
With our AI Filemorph that is actually possible: You upload large amounts of documents, that are converted and linked to database records.
The Filemorph process
What the user sees
- Bulk upload of files
- Each file is converted to a record
- Record attributes are populated with data from the file
- The source file is attached to the record
What happens behind the scene
- Files are uploaded
- For each file
- Create a record
- Uploaded to the new record
- Files are converted text streams
- Some files will be OCR processed
- For each attribute in the record
- Pass data and ask question to language model
- Transform and populate the value
Conversion cost will be roughly 0,1 DKK per attribute per record.
Communication
MitID & eBoks
Via the builtin interfaces to eBoks and MitID, it is possible to interact with users that we have no previous interaction with.
No email or account is required, because CPR numbers (danish social security) are used as key for their persons.
eBoks messaging
The eBoks interface will allow you to send messages in the same way as you send an email notification.
The usecases are
- Only contact information is CPR
- Content to sensitive for email
- Proof of delivery and read requirements
A requirement for sending eBoks messages is having an account at Strålfors or PostNord. Most government institutions already have one, and new access points can be set up in a day or so.
Cost will vary according to our deal.
Instructions
- Set up eBoks account
- Add a CPR field
- Add a Status action
- Activate Notification
- Set Email raw / Dynamic = The CPR field
MitID authentication
MitID authentication can be used in a couple different ways
- Required before running a questionnaire
- Required before running a followup survey
- Login linked to a user profile
Variants include prompting the user for the users CPR number.
Cost for each successful login i approx 1 DKK.
Instructions
The following will set authentication before running a questionnaire
- Set up Criipto account
- Add entity interface
- Choose: Criipto (MitID/NemID)
- Click on NAME field > Assign
- Set User property = fname
- Click on CPR field > Assign
- Set User property = cpr
MitID signatures
MitID can also be used for digitally signing documents.
The typical process is
- Some event is triggers a status change
- A document is generated and populated with data
- Document is sent to eBoks AND user is notified
- User logins with MitID and signs document
- Signed version of document is returned to TS
- Record changes status
Cost for each successful signature i approx 8 DKK, including the authentication.
For more information see Document signing
User notifications
This popup will display important notifications for you personally
The overview will contain basic information about the record as well as the context. The record in question will be displayed if you click the text.
Various sources for notifications displayed exist
- Status actions in workflows
- Responsibility for data items
- You are set as the active user in a record field
- A group you belong to is set as the active group in a record field
Compliance
TS No-Code Platform is designed to make sure that systems built on can be compliant without any work that needs to be done
- Security (ISO27k and ISAE)
- EU law (GDPR etc)
- Financial regulation
OWASP security
Depending on setup of the server OWASP level 1 or level 2 can be reached. This includes almost all security requirements such as
- Mitigation of common threats (SQL injection, CSRF etc.)
- Request throttling
- Password reset procedures
- Logging (see below)
- Multifactor authentication
Read more about it in Security setup
GDPR support
Data can be marked up and coupled to automatic deletion or anonymization,
WCAG (disability)
The UI supports the guidelines required for screen readers to work.
Key navigation
Nearly all operations in TS No-code can be performed without the need of a mouse or touchscreen.
Note that the behaviour is slightly different based on which facet of the system is displayed.
Simple / Standard
| key(s) | function | notes |
|---|---|---|
| Escape (ESC) | Select "Logout" action | |
| Tabulator (TAB) | Navigate to next tab element (menu/solution) | Ignore add, views and recent items |
| Arrow up/down | Navigate to next solution in menu | Ignore add, views and recent items |
| Arrow right/left | Select next menu item |
Advanced / Accordion
| key(s) | function | notes |
|---|---|---|
| Escape (ESC) | Select "Logout" action | |
| Tabulator (TAB) | Select next solution in active section | Ignore add, views and recent items |
| Arrow up/down | Show/hide different solution sections | |
| Arrow right/left | Select next menu item |
This version of the menu requires a special need for combined use of
- UP/DOWN: select section
- TAB: select solution
- ENTER: show solution
Note that the section selection is saved to a cookie, to ensure that the same sections are displayed as on previous visits.
List mode
Note: The "Add record" is automatically selected when entering a list
| key(s) | function | notes |
|---|---|---|
| any letter (a-z) | Open quicksearch at top of the page | Search is always visible with touch devices |
| Escape (ESC) | Select "Main menu" action (go back) | |
| Arrow up/down | Navigate to records in list | Enter will open record in edit mode |
| Arrow right/left | Select next menu item |
Form mode
Normally focus will be set to the first input element in the form.
| key(s) | function | notes |
|---|---|---|
| Escape (ESC) | Select "Display list" menu item (go back) | |
| Tabulator (TAB) | Navigate to next input field | Skips links for upload, sub record creation etc. |
| Enter (ENTER) | If in input box: Data will be submitted | Standard www behaviour |
Arrow keys are excluded because they are used in text areas etc.
Traceability
Applications can have the following logging
- Access log
- Action log (events and actions)
- Revision log (copy of all changes)
Additionally the user management can provide
- Login history
- History of former group membership
Finally all changes to an application are logged centrally
Dashboards
Dashboards are informational boards consisting of a multitude of widgets.
We often segregate dashboards into
- Operational dashboards
- Management dashboards
Widgets for everything
TS has a long list of content
- List of items to handle
- Aggregated data
- Graphs
- Tables
- Shortcut buttons
- Adding registrations
- Performing searches
- Custom parts
- SQL views
- Codeunits
- Context selectors
Access to all widgets are controlled via groups, and the Dashboard will automatically layout the content to each user.
AI assisted reporting
Advanced reporting will often require complex queries to get and illustrate the data that you want.
TS has an AI assisted query builder that can be prompted using clear text
Give me Top 10 customers where order sums are larger than 10000, for orders in the current month This will generate the required query, display in a diagram and all you need to do is to click: Add as widget
Please note: Your data is never in contact with the underlying language model
Customized content
All views can support the following references
- "ME": Placeholder parameter for the current user
- NUMBER: Relative reference for time (0 = today, 1 = tomorrow etc.)
In order to handle permissions gracefully across different users types, data ownership filter tags can be inserted into SQL statements.
Note that users can also save their own searches and list views: Features/Personal views
Data handling
How to work with data using the platform
Advanced input forms
Usage
In TS it is possible to configure very advanced and dynamic input form behavior. The goal is to minimize the effort required to enter data, and at the same time maximize data quality.
In case you need step-by-step questionnaires or wizards, we recommend looking at Questionaires
TS has implemented more than 160 fields of various types, as documented in the Field reference
Validation rules
Validation of field values can follow one of the following
- The value is required
- Can be validated by a Regex expression
- Have a value within a minimum and/or maximum
Value ranges will differ according to data type
- Numbers: The value
- Text: Length of text
- Date: Allowed years
- Files: Number of files
Note that dependencies are resolved before validation, so in case a field is not relevant the validation rule will be ignored.
Instructions
- Click on field
- Check of Validation
- Remove check in Allow empty values
Field dependencies
Fields can be dependent on values in other fields. Specific values, value ranges or list of values.
Show SUBCATEGORY if CATEGORY contains either Foo, Bar or Foobar Show field NOTES if PRICE is higher than 1000In case the dependency is even more complex, an expression written in JS can be defined and linked to the field
Workflow dependencies
Fields can be dependent on the records location in the workflow governing that entity. Each status is assigned a status level.
Fields can then refer to the workflow model with restrictions
- Status level FROM
- Status level TO
If the status restrictions are not satisfied the field will be removed and validation requirements will be ignored.
Note that 0 signifies that the status level restriction is disabled.
Instructions
Learn to setup Features/Status level dependencies
Lookup fields
TS contains a lot of specialized lookup fields that have defined datasources ready
- Danish postal codes
- Danish addresses (DAWA)
- Countries and currencies
- NACE codes (tree searchable)
- UNSPSC codes
- SKS framework (7 subtypes)
The DAWA lookup can also work together with a Google Map. Entering an address will update the map with the location, and clicking on the map will find the address.
Duplicate prevention
To ensure that the same data are not duplicated by mistake, it is possible to ensure that new records are unique based on values in one or more fields.
Learn to set up Features/Duplicate prevention
Archived data
The archive mode will enable or disable display of hidden (deleted) elements.
Toggling the archive mode
- Activate by clicking archive icon
- Deactivate by clicking archive icon AGAIN
When in archive mode display of "normal" elements is disabled.
Cloning records (Copy/Paste)
Copy
Copy will put all values in the current record to the clipboard.
Later you can paste the values into a new record, and just change the few values that differ.
Note:
- Only field type data (text, number, dates etc.) will be copied.
- Files and related records will not
Paste
Paste will put all values in the current record to the clipboard.
Later you can paste the values into a new record, and just change the few values that differ.
Note:
- Only field type data (text, number, dates etc.) will be copied.
- Files and related records will not
Data reports
In order to see the data you want to
- Selecting data
- Working with data
Selecting data
Data selection in TS is easy due advanced functions
- Partial strings
- Numerical ranges
- Date period ranges
- Included in other views
- Location areas
Criterions may be combined with boolean operators AND and OR
Users will often search for the same data again and again, so they have the option to save a view.
A view will include
- Filter criterions (see above)
- Displayed fields
- Sorting or grouping
Furthermore administrators can share their views with all users on the system.
Visualizing data
Sets of data can be illustrated and analyzed in many different ways
- Graphs
- Calendars
- Pivot tables
- Kanban board
- Heatmaps
- Google maps
The above reports can also be included as widgets in a Dashboard.
Statistical testing
Advanced analysis options for data include
- Chi / T / tests
- ANOVA analysis
- Distributions
- Cyclic analysis
In addition Six Sigma tools such as Run charts and Pareto diagrams are included.
Duplicate prevention
What it is
Example:
A hr-management system is used to hire new employees that have to be registered with information such as name and email address. During this registration mistakes can happen where an employee is registered multiple times, creating duplicates in the system with different system ID's. To prevent this there should be some part of the data from the employee that would not impossibly exist for another employee, such as the email address which by design are unique. If you are adding a record of an employee whose email address already exists in the system, then that employee certainly already exists in the system. Other suitable types of data could be Social Security Numbers or CPR numbers, which are also unique by design. If no such suitable data field is available, two or more fields can be used, so that they in combination constitute a unique value. It is for example unlikely that two people with the same name and same date of employment should exist.
Guide
To prevent duplication when records are created, the entity needs to be set up right. Either a single field or a combination of fields need to be designated as being a unique key, meaning that if you attempt to create another record with the same combination of fields, you will be prevented form doing so. This can be some field with inherently unique data or for example the combination of a date and a name, where the chance of another record sharing the same date and name is considered extremely unlikely.

To set a field of an entity to be a unique key, go to that entity in the back-end and select your chosen field as shown in picture 1.
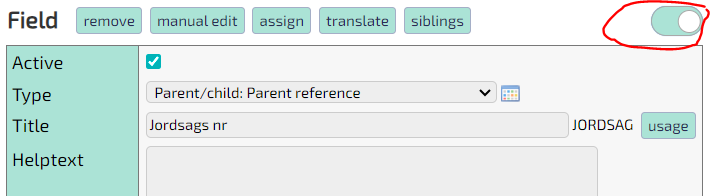
The unique key feature is an advanced one, which means that you have to toggle the advanced view as shown in picture 2.
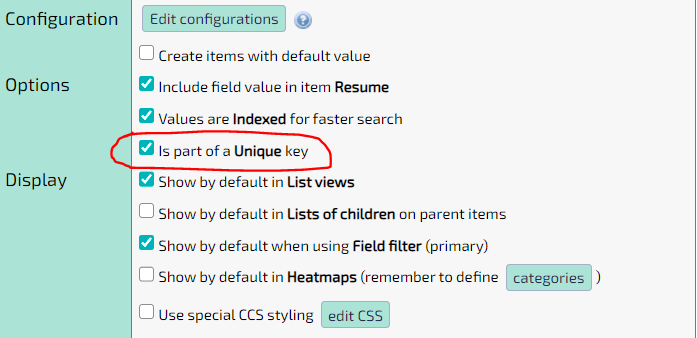
Now enable the check mark as shown in picture 3. Your chosen field is now part of a unique key. If this is the only field with this check mark enabled, then this will be the only key. If you select a second or third field, then the combination of the values of those fields will be the unique key.
File management
TS solutions will often include files either as related content or generated artifacts.
All you have to do to add file support for a solution, is adding field of type Files. Office files can be edited online (WebDAV) and media files will be handled gracefully.
Note that it is also possible to bulk convert documents to structured data using AI document conversion.
WebDAV editing
WebDAV will the user to edit files directly without the need for downloading and the uploading the files. Note that you must have WebDAV enabled software such as Microsoft Office installed.
Supported formats include
- Word (docx)
- Excel (xlsx)
- Powerpoint (pptx)
If the server is added as a trusted site, it is also possible WebDAV edit files containing macros (doxm,xlsm,pptm).
Instructions
- Enable WebDAV in configuration
- Click the icon with pencil overlay to edit a file directly
Document generation
Documents can be generated by inserting data in special tags in predefined templates.
Output includes
- Word
- Excel
- Powerpoint
Instructions
- Entity > Advanced
- In template list press: Add
- Upload file
- The file can contain tags that must match field name in the solution
- Set displayed template name
- Optionally set output fieldname (must be a file field)
Document signing
Signing will be handled by external providers.
TS supports
- Criipto (MitID, BankID, etc.)
- DocuSign
Unless you need international signatures, TS recommends Criipto. (Docusign pricing is steep and the plans are quite inflexible).
Instructions
Use the following to set up Criipto document signing
- Create an appropriate template
- Add an Status action
- Activate codeunit execution
- Set codeunit to
- dk.tempusserva.signing.criipto.CriiptoStatusAction
- dk.tempusserva.signing.criipto.CriiptoStatusActionGenerator
- Modules > Configurations
- oauthCriiptoAllow: true
- oauthCriiptoClient: From Criipto setup
- oauthCriiptoHost: From Criipto setup
Media files
Media files are natively supported without the need to change anything
- Images have thumbnails generated
- Videos open in a player
- Videos support streaming (jumping / skipping in the playback)
It is also possible to use specialized fields in solutions
- Files: Pictures
- Image uploads on mobile devices can use camera as a source
- Files: Videos
Note that it is quite easy to set up an automated video scaling process, if the underlying storage is S3.
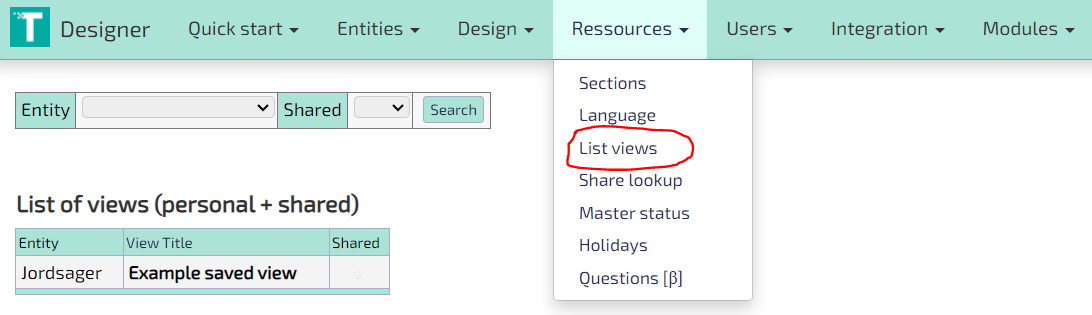
Personal views
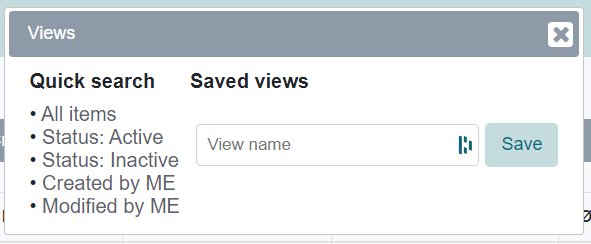
A View (also called List View) is a specific showing of a list of records from an Entity. Using the search and advanced search functions, you can choose to exclude records form the View using different parameters. The currently active parameters can be seen below the View. To save the parameters of a View for later reuse, click the 'Views' button in the functions menu and give the saved View a name in the text field
Initially this saved View is a Personal View, meaning that only you will have access to it. To make it a Shared View, which every application user has access to, navigate to the back-end and select the 'List views' option from the 'Resources' dropdown menu. Now select the name of the View and check the 'Shared' box. The Personal View is now a Shared View instead.
Other users who use the Shared View are still restricted to the information available to their own user group. You can therefore not accidentally share unauthorized data by making a Shared View.
QR and NFC actions
The purpose is to ease access to webbased resources, so the user can do things with a simple gesture or action.
Common usecase scenarios are
- Working with inventory
- Consumers accessing information
Scanner verbs and nouns
TS facilitates a special automation language, where work can be handled simple by scanning codes.
The idea is to, in any order, scanning both
- A reference to a OBJECT to work with
- An ACTION you want to use on the selected object
The user scans the QR code for order 123. The user scans the QR code for "Order ready". Order 123 changes status to "Order ready".
QR codes for OBJECTs and ACTIONs are typically displayed in templates for easy printing.
Service pages
Service pages at publicly accessible content, that can be accessed via NFC or QR.
Optimally will redirect from an intermediary URL to the final destination, in order to be able to change the destination after the codes are printed (QR) or written (NFC).
Questionnaires
Usages
Questionnaires are used for data collection for external parties.
TS questionnaires can be used in two modes
- A public page everyone with a link can access
- Specific requests sent to a user to add information to a record
Access are given by adding an interface to an existing entity and defining access to fields.
Interfaces and questionnaires
Normal questionnaire is a link that creates a new record that an anonymous user populates.
Returning questionnaires will be sent to a specific user, and contains access token for an existing record. Tokens are normally sent by status actions, normally to an email field on the record.
Instructions
Learn how to set up a questionnaires and Interfaces
Quiz and training module
In the quiz module you can set up questions, answers and scores. Afterwards you can set up a questionnaire, with random questions that the user is asked.
Questions are ordered into a structure
- Domain: Grouping just for order things
- Topic: Areas questions will be randomized in
- Question
- Answer
Instructions
- Set up questions: Designer > Ressources > Questions
- Create a Domain
- Create a Topic
- Create multiple questions
- Add answers and set the correct option
- Create a questionnaire
- Add a field of type: eLearning: Quiz suqestion list
- Add a number of question you want asked
- Point to the Topic you just created
- Add a field of type: eLearning: Quiz suqestion list
Recent Items
This function displays a popup with links for recently accessed items for this type / solution.
The items are named according to their Resume signature - the same which is displayed when searching or when a reference is set for a record.
The recent items are also available from the main menu.
Relational database
Since the 1960 it has been well known that SQL databases are the way to go for complex systems storage.
TS is based on the MySQL / MariaDB / Percona databases, and all data is fully normalized granting multiple benefits
- High performance with high volumes
- Easy to integrate with BI systems
- Predictable structures
Scalable applications
Applications built in TS will adhere to common design practices ensuring good performance, stability and integrity.
The platform is very scalable in regard to
Complexity
You can keep extending the models as far as needed, using the Parent and Child relations.
Due to a very elaborate and flexible permission model, multiple user types and scenarios can easily be supported on the same setup.
We even support logical constructs such as many-to-many relations. TS has customers running more than 350 linked applications on the same server.
Performance
TS databases are largely unaffected by data set sizes and number of concurrent users.
There building configurations for indexing fields, and the built in searches can be supported by Elastic search and indexing.
To prove our point we have actually had the whole platform running smoothly on a Raspberry PI.
Volumes
Databases will handle large amounts gracefully, but large object sizes will often cause problems in back/restore scenarios.
TS supports unlimited file size and count, using a mixed database and block storage approach.
Relational searches
A common problem querying data is specifying criterions and values in different parts of the model
Show orders where the sum > 10000, and one or more ordelines refers to the product Smart TVIn TS this is handled gracefully by allowing interlinked searches
Look at parents referring children
- Make a search in the child items (optionally name the view)
- Set search criterions normally
- Make another search in parent item
- Set search criterions normally
- In the List of children field refer to the CURRENT_QUERY (or given name)
Look at children referring parents
- Make a search in the parent items (optionally name the view)
- Set search criterions normally
- Make another search in child items
- Set search criterions normally
- In the Parent reference field refer to the CURRENT_QUERY (or given name)
Searching
A simple search will provide search options for fields already displayed in the list.
The search window provides you with the following options:
- Define filter/search values
- Select which fields to display
- Quick access to analysis
The setup of the list view can be saved for later use by using: View function
Setting search values
When setting search criterions these are appended to existing filters. Normally "AND" operators are not needed, as TS assumes an implicit AND between multiple criterions
Example:
- The list is filtered with: Status = "New"
- Another criterion is set: Date > 31/12/2012
- The list now displays only values where
- The field Status has the value "New"
- AND
- The field Date has a value greater than 31/12/2012
Criterions are displayed at the bottom of the page, and remain in place until you add the "New search" option when searching or logging out of the system. Note that each criterion can be removed by pressing the minus icon.
Selecting fields for display
By enabling/disabling the checkbox next to a field, you can control is the field is displayed in the list.
Note that
- It is possible to set criterions for fields that are not displayed
- Data exports til XL includes an option to display ALL fields in an export
Quick analysis
Some fields have an graph icon next to them, which allows access to analyze this variable.
This will provide you with
- A count of the different values
- A bar or piechart of the data
Status level dependencies
What it is
Example:
A hr-management system is used to show information on employees who are assigned to projects. These employees are either currently working on a project or between projects. Or they might be in the process of being hired and would therefore not be a full employee yet. Depending on which of these states the employee is currently in, different information about them would be made available. If they were under consideration of being hired, we should see their application. If they were working on a project, we should see their work schedule. If they were between projects, we should see the end date of their last project. Each piece of information should only be made visible for the status in question, since they make no sense or are unimportant otherwise. Status level dependencies are used to manage this visibility.
Guide
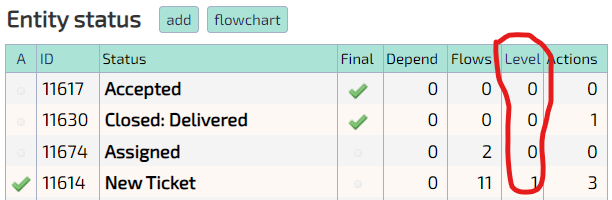
Status levels are numerical categories that one or more statuses can belong to. Individual Fields in an Entity can be configured to depend on these levels such that they can be made inactive and hidden if the Entity record is not in a status with the correct level. For example can the dependency be set for all status levels above a certain value such that one or more Fields are only active and displayed for those levels. To see the status levels of an Entity's statuses, go to that Entity in the back-end and look in the column shown in picture 1.
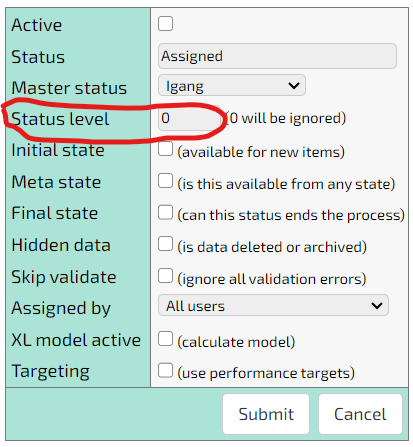
To change a status's level, go to that status and edit it as shown in picture 2.
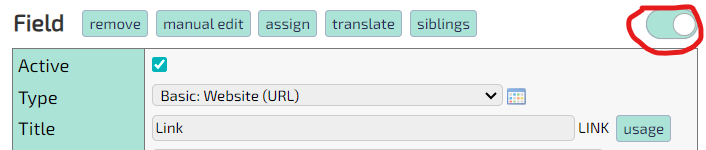

To set the dependency, toggle the advanced view of the Entity panel on as shown in picture 3 and go to the bottom as shown in picture 4.
Using Views
The view dialogue allows you to save searches and field selection in views.
The views are normally personal and will only be displayed for you as a user. The administrator can however share already created views, which are usable but not editable for you.
Creating views
After selecting fields and setting search criterions, you can save the setup for later use by
- Setting a name in the textbox for the view
- Pres "Save"
The named view is now displayed in this dialogue as well as on the solution overview (the page shown after login).
Deleting views
In order to delete a view just press the red minus icon next to the view.
Changing views
It is currently not possible to edit views after their creation, but you can always make copies with the same name
- Click the view you want to change
- Make modifications
- Save the view using the same name as before
- Delete the old view
Viewing and editing data
Work in progress...
Importing and exporting data
Export excel
Export will create and download a file readable by Microsoft Excel or any other 3rd party Office product.
Export file options include
- All records: Unlike the default limited to the records displayed in this page
- All fields: Unlike default limited the fields displayed in the current view
- Explode parents: Include data from related parent records
- Explode children: Include data from related child records in denormalized (flattened) form
- System export: Use system name in columns (good for later CSV imports)
After downloading the file you should save it in you preferred format using "Save as ...".
Exporting for Print
Print view will display the current page with certain elements removed
- Website wrapper (menus, headers and footers)
- Tempus Serva navigation (menu and pagers)
- Links and optional features
Furthermore single records will be displayed in display mode (edit elements are removed).
Import CSV
The import function allows selected users to upload data, for either creation of new or update of existing records.
Using import
All normal restrictions are in place, so there will be no difference between imported and data entered manually through regular forms.
During import each line in the import file is handled as a separate job. Consequently some lines may fail and some lines may succeed: The results can be retrieved after the import where a modified version of the import file including the success/failure status information, will be returned to the user. This file makes it easy to error correct, as the the format is exactly the same as the import file.
Import format
Import files must apply to the following restrictions
- File content is in CSV format
- Column names should use the field system name.
The easiest way to build a working import template, is making a Excel file export with the "System export" option enabled.
Options
Imports can have certain options included that change what happens during the import
- Continue on errors: Do not stop processing on single field errors
- Ignore empty values: Empty values are never processed (default: treat as "" or null)
- Disable codeunits: Disable custom functionality
- Disable validation: Disable field restrictions
Warning: Do not use the last two options (codeunit/validation), unless you 100% certain how the solution works.
Enabling user profiles
Add the role data handler for the users that should be allowed to import data
Designer > Users > Edit users > [USER] > "Data handler"
Integrations
Custom code
In some cases there will be a need for specialized functionality.
Using codeunits you use all of the existing nocode features, and just do the special features in custom code.
The platform will handle WHEN to execute the code, while you make the code do WHAT you want.
Note that custom extensions are loaded dynamically, so the platform can still be updated independently of your custom code.
Many extension points
Your custom code can be plugged into various points
Pages
A page will display file or HTML content, with or without navigation wrapped around it.
Normal pages will only be served to authenticated users, while the public variant can be served to anyone accessing the URL.
Link via: URL (example: main?command=xxx)
Event handlers
An event handler will extend the behavior of an existing entity.
Multiple function handles ensure your code can be executed at the right time: beforeSelect, beforeRender, beforeUpdate etc.
In addition it is also possible control navigation flow after updates or build custom permission schemes (see below).
Link via: Designer > Entity > Advanced > Codeunit
Status actions
Actions will allow certain code to run as if it where a normal status action: Timed, On enter, On leave
Link via: Designer > Entity > STATUS > STATUS ACTION > Codeunit
Scheduled code
This is used for custom code that you need to run without user intervention.
Link via: Designer > Modules > Configuration > serviceRunCustomCodeunitClass
Global content
This codeunit can inject HTML content into all pages on that instance.
Link via: Designer > Modules > Configuration > dk.p2e.blanket.codeunit.common.PageStaticContent
TS NoCode API
The TS API will enable access to all relevant things in the system, including your own custom models.
Data can be queried and updated via the object model, that will ensure that all rules and permissions are respected.
See detail and code examples in API v1.0
All requests will be passed references to
- DB connection
- User profile
- Session variables
- Server settings
- Policies
- Cache
Custom security
Custom security is an option in Event handlers, that allows you to build custom security schemes.
Usecases include
- Users profile must be related to some other data
- Users permissions are change over time
- A records attributes defines who may see it
- Access to records are governed by the records relation to other records
You simple write an SQL filter that can be appended to all database queries relating to that entity.
eBoks
Send messages via eBoks
Email import
Read POP3/IMAP, autocreate records
FTP
Expose uploaded documents via FTP.
OLAP
Exposing Mondrian OLAP Cubes
REST service
Expose data though REST.
Send notifications
Send notifications to users via SMS/Email
SMS
We currently recommend https://www.cpsms.dk/
Sign documents
Sign documents using DocuSign or MitID
WebDAV
Expose uploaded files via WebDAV
Search indexing
Background
TS provides a special page to use for enterprise search indexing. The pages served through the search servlet, will be stripped of unnecessary content including links, forms and other "active" types of content.

Indexing setup
- Create a search user
- Assign groups corresponding to content that should be indexed
- Add a new source to index (see Constellio example below)
- Set source endpoint to <server>/<application>/search
- Activate Basic authentication to new user
Search box integration
To enable the user to search from the pages in TS a search box.
Options include:
- Inherit a search functionality from page referenced in Wrapper
- Insert a search form in a Wrapper (probably "Header padding")
- Insert a search form in a Section header HTML
Search form mentioned above are nothing but static HTML code
Security
Security and compliance features that is built into the platform
Bruteforce
In order to prevent brute force attacks on passwords to measures are implemented
- Maximum number of retries for passwords
- Detection of spread attacks across multiple accounts
Maximum login retries
Configuration options for Maximum number of login retries are
After the defined amount of retries have been reached, the user account is suspended.
There is an option for automatic password reset (password is sent to user).
Brute force detection
Detection of spread attacks are implemented by registering the number of failed login attempts during a defined amount of time.
If a certain threshold is passed, the server will temporarily deny further login attempts, for a defined amount of time.
During this period the server will function normally for already logged in users.
Configuration options for brute force detection are
Compliance built-in
Activity and data logging (optional)
Activity and Data Logging includes the automatic creation of a series of log files. Logging can be set up for each entity in an application providing insight and transparency in relation to: user activity, creation, changes and status of different records in an application.
- Access Log: Can be activated on an entity in an application. This automatically generates a log of which users have accessed and/or edited a given record.
- Status Log: Can be activated for an entity in an application. This automatically generates a log of the history of the created records, which shows how long a record has been in each status
- Change Log: Can be activated for an entity in an application. This automatically generates a log of what changes have been made to the individual records. Including who has changed what and when (timestamp).
How to: Each option is activated on the entity Advanced page.
Pro tip: Especially the status log can be used for setting up performance charts on dashboards, as it can give detailed information of how much time was spent in each step.
Versioning (optional)
By default file versioning is supported on the "Documents" and "Files" field types. In addition, data revisions can be supported on each entity. This automatically builds an audit log for each record.
In addition data revisions can be supported on each individual entity.
How to: Data revisions is activated on the entity Advanced page.
GDPR Deletion Policies (optional)
For each entity in a TS Application, a GDPR Deletion Policy can be set up, enabling automatic deletion or anonymization in accordance with the specified rules. The application will thus automatically delete or anonymize data and files in the application, cf. specified criteria.
How to:
- Set up an action on a entity status
- Check of deletion policy
- Choose between anonymization or deletion
- Optionally select log data to also be deleted
In case you choose "anonymization" you should define how each field should be handled
- Click on a field
- Click on Assignment
- Check of anonymization
- Optionally set value after change
Event and System Logging (recommended)
When Event and System Logging are turned on for an application, the following events are logged automatically:
- User logins
- Successful normal user logins are hidden
- Also contains client IP (used for MFA)
- System events
- User errors
- Scheduled services
- Administrator logins
Error events will include stacktraces if available.
The eventlog can be cleaned automatically on a regular schedule.
Compliance external
Request logging
The webserver itself can be set up to do make detailed logs in file, containing for example
- Request timestamp, IP and session ID
- Stacktraces on errors
Depending on your security setup you might want to log these to a central repository
Data restrictions
Understanding permissions
Data access is restricted in two ways
- Mandatory permissions granting access to
- Certain groups of fields (blocks)
- Records in certain status
- Optional filters binding certain data to certain users
- Owner user (the user that created the record)
- List of users (dynamic list of users for each record)
- Per group (group property)
If a user has no active permissions, they will not have any kind of access to the solution. Filters on the other hand is just considered to be additional restrictions, limiting the access granted by permissions.
In both cases the security restrictions always apply, even during system access, API interaction, integration etc.
Permissions [mandatory]
Permissions to solutions are granted as a sum of multiple permissions.
Each permission contains
- Group
- 0-1 Status (records have status)
- 0-1 Blocks (fields belong to blocks)
- Allow read
- Allow write
Permissions stack in an aggregate like manner, allowing to build complex structures from different fragments. This is also the reason that the Allow read and Allow write properties can be set to empty values (typically for generic permissions).
Differentiated FIELD level access
Fields belong to blocks. Permissions may be bound to such a block.
A permission with a block specified will ONLY apply to the fields belonging to this block.
Differentiated STATE level access
Permissions may be bound to a certain status.
A permission with a status specified will ONLY apply to records in this status.
Filters [optional]
All ownership options can be overridden by belonging to a certain group, that ignores all types of filters (3 below).
Access to configuration:
Designer > [solution] > Security - Filters
Ownership by data exclusive group
Designer attribute: Use Exclusive groups for access control
The solution contains a Exclusive group that defines a group with access to this piece of data.
- Scope: Group
- Cardinality: One
Ownership by data member lists
Designer attribute: Use Lists of members for each item
The solution contains a memberlist field where users can have their access added or removed. Behind the scenes a table with a relation between the record and the user is maintained.
- Scope: User
- Cardinality: Many
Ownership by being the creator
Designer attribute: Use Creator only restriction (ignore group recommended)
You must have created this record in order to see access it.
- Scope: User
- Cardinality: One
Encryption
HTTPS / SSL is readily supported as the interface is indifferent of which protocol is used by the user.
It is however possible to force the user to use SSL by tweaking the configuration
- Force SSL during logins
- Force SSL in interface
Users making specific requests, will receive a rewritten redirect including all parameters, from the original request. The recommended setting is always using SSL at all times.
Guide to set up SSL: Setting_up_SSL/HTTPS
Security baseline
Security by design
The platform is security designed in accordance with OWASP version 4:
- Level 2: Compliant
- Level 3: +90% supported
In addition the platform supports a wide range of security schemes and logging features, needed for support of ISO27001, ISAE3000 etc.
The platform is subject to periodic penetration testing. Last customer testing was july 2021.
Default security
By default the TS Platform is verifiably secure to all common threat vectors, such as
- SQL injection
- Cross-Site Scripting
- Session highjacking
- Login replays
- etc
Protective measure includes common hardening efforts, such as
- Data sanitization
- Request throtling
- CSRF tokens
- etc
In addition to this baseline additional features can be activated per installation.
- Built-in: Features in the product itself
- External: Measures controlled in application server or operating system
Security built-in
Password Policies (recommended)
TS No-code Platform allows you to setup and enforce the use of strong passwords through an appropriate password policy. Specify attribute requirements that control complexity and lifetime of passwords such as:
- Minimum password length
- Special characters
- Maximum password age
- Maximum number of tries
The structural restrictions will be honored when
- The user changes his password
- A new random password is generated and sent
Passwords can also be set to expire after an amount of time.
How to: The polices can be changed in server configurations in the group Password policies
Note: The password polices will have no impact on SSO authentication
Multi-factor Authentication (recommended)
Device MFA
TS No-code Platform offers native Multi-factor Authentication to protect against unauthorized access by requiring a user to provide multiple authentication factors to prove their identity. At present two different options are available:
- MFA using session-specific, one-time-passcodes sent to the users mobile phone via regular or Flash SMS
- You will need to create an account for sending SMS
- Cost is approx. 0,30 DKK per message)
- MFA using a dedicated app from
- Apple
- Microsoft
SMS requires very little of the users, while App based MFA is considered (slightly) more secure.
Note: If using singlesignon (SSO) the MFA will not be used
Location MFA
IP can be used as factor. In some cases slightly less secure, but much easier for the user.
Options include
- Country whitelisting (via IP)
- Static whitelisting of IP's
- Adaptive whitelisting of IP's
Adaptive whitelisting happens when the same user logs in from the same IP multiple times (typically 5).
IP MFA can be used together with normal MFA, so that SMS/App check is only required in case the IP is not whitelisted.
Geolocation blocking (optional)
Geoblocking will allow the servers to deny requests from certain countries.
The geoblocking will match the clients IP against a Geo service. The county will be matched to the servers whitelist of country names.
How to: Change the system configurations starting with ipBlocker
- Activate setting ipBlockerActive
- Set allowed countries in ipBlockerAllowedCountries
Request throttling (optional)
As specified in OWASP v4 system should be able to limit the amount of request a user can carry out in a system.
Limitations can be set on
- Pages hit
- WebDAV requests
- Upload (size/count)
- REST operations
How to: Edit server configurations starting with limit
Brute force prevention (optional)
This protection is handled by not serving too many requests to the login page, regardless of the source in question. This will prevent brute force attacks on distributed accounts using multiple machines. In case the detection triggers, login requests will be ignored for at set amount of time, while already logged in users can continue their work.
How to: Define systems configurations starting with brute force
Additional configurations
- File whitelisting (uploadWhitelist)
- OWASP compliance (owaspCompliance)
Security external
Virus scanning
Scanning of uploaded files are left to software installed on the system.
The upload feature will temporarily store the files on the file system, so that detection mechanisms can quarantine the files in case they are infected.
Storage encryption
Storage encryption is normally supported by the underlying technologies, with the possible exception of password hashes (handled with BCrypt).
MySQL (+8) supports multiple encryption schemes
- The whole database
- Single schema (each TS installation)
Read more about encryption for MySQL and MariaDB
O/S level encryption technology includes
- Windows: BitLocker
- Linux: LUKS
Transport encryption (https)
Minimum requirements are SSL certificates. On Linux these can easily be obtained for free via LetsEncrypt.
Optionally the server can also apply to HSTS, using the following guideline for Tomcat.
Denial of service attacks
Protection against DOS attacks are best handled using dedicated services such as Cloudflare.
Single sign-on
TS NoCode contains its own user management. In order to minimize the effort in maintaining the profiles, and require less effort for users already authenticated in other systems.
Oauth2
There are multiple Oauth 2 sources available
- Azure
- Office 365
- MitID
Note than only the Office 365 source can be used to synchronize group membership.
Implementation
Setup will require 2 steps
- Setting up the SSO source
- Configuring your TS platform
In Designer > Modules > Configuration set up the following properties
- oauth____Allow: Set to true
- oauth____Tenant: From step 1 above
- oauth____Secret: From step 1 above
- oauth____Client: From step 1 above
LDAP integration
LDAP integration is not SSO per se, but rather using LDAP as an authentication source.
- Use LDAP to authenticate
- Import and link groups
Implementation
Learn about how to set up LDAP integration (insert link)
TS as Oauth2 provider
In case you want other systems to use TS to authenticate users, the platform can be set up to respond to Oauth2 requests.
Implementation
Contact TS support team to get a link to the required Wordpress SSO plugin
Also
- oauthWPAllow: Set true
- oauthWPClient: Set to anything
- oauthWPSecret: Set to anything
- oauthWPHost: URL of the Wordpress server
Services
Services will allow Administrators to carry out certain maintenance functions.
- Control the cache
- Rebuild or test certain resources
- Acquire information about system services
- Manage emergency mode and messages
Static content pages
Option 1: Dashboard page
Dashboard pages are preferred as you can easily control access via groups
- Add a new dashboard
- Add a widget in the dashboard
- Choose type HTML
- Copy/paste HTML code into content
- Set width to 12 (full width)
Option 2: Using a codeunit
Make a call to one of the static page codeunits
main?command=dk.p2e.blanket.codeunit.common.PageStaticContentmain?command=dk.p2e.blanket.codeunit.common.PageStaticContentNoMenuPage content can be configured in: Modules > Static content
Statistics
The statistic analysis will allow you to carry out different statistical tests and illustrations
- Statistical test: Perform Chi2 or t-test on data (test type is autoselected)
- Analyse variable: Distribution diagrams and basic metrics (sum, count, min etc.)
- Regression analysis: Corellation between two continous variables
- Paretho chart: Sorted aggregated distribution in categories
CrossTabulate
This will allow you to display pivot tables of the data.
A pivot table will contain
- x-axis: First grouping / category
- y-axis: Second grouping / category
- Cell values
- Count number of records
- Sum for a selected variable
- Minimum for a selected variable
- Maximum for a selected variable
Note that you do not have specify both x and y-axis.
The pivot tables respects the active filters and search values.
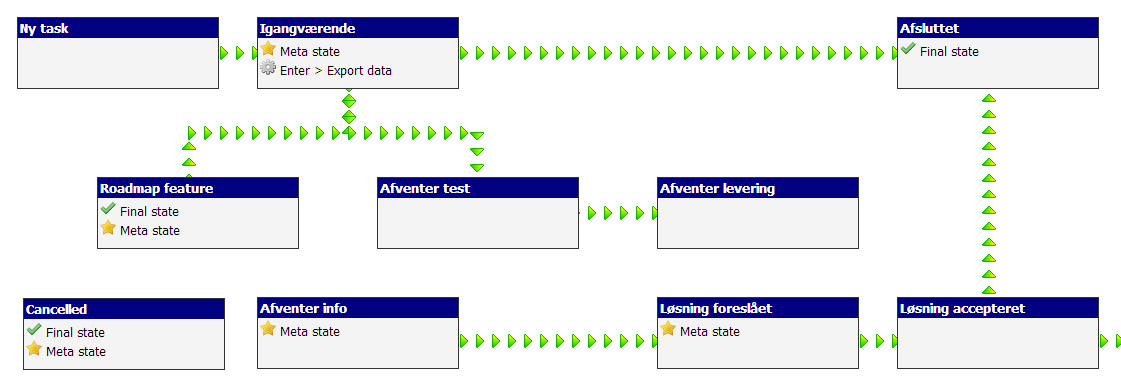
Flow Diagram
The diagram function displays the workflow associated with this solution.
Information provided
- Routing to state (either arrows or "meta")
- Usergroups with access in selected status
- Automated actions: Notifications, state changes etc.
- Expected and tolerable waiting time
Heatmap
Heatmaps will provide you with a color graph, based on values and categories in fields.
All filters and field selections apply for the output.
The threshold for each color is set in the fields, and are normally restricted to numeric types or categories.
Heatmap enabled fieldtypes include
- Integer and decimal values
- Enumeration and symbols
- Lookups with categories
RunCharts
Runcharts will display user activity in the solution.
By default the following diagrams will be displayed
- New items: Amount of records created per day
- Activity: Amount of records changed per day
- Completed: Amount of items reaching a status which has the "Completed" property
Note that the "Activity" diagram will change with every update (not built from historical data), and is therefore not a measure of work completed in a day ("record inactivity" is actually a more precise description).
Many other diagrams can be configured if needed - contact you local solution administrator.
Status History
This special report will display a timeseries analysis of:
How many records where in which states at a given point in time
The analysis is built on historical data that has been changed at a later point in time, so each point reflects the count by status on that particular day. Filtering options include status and timeframe (to/from date).
Status based workflow
Status
Each record in TS no-code has a status assigned.
A status signifies the state of the record, in regard to maturity, responsibility and degree of completion etc., but also serves as an anchor for automated actions and permission for users.
A default status is always assigned. After that the status can change either manually, or as a result of automated action.
Sources for automated changes include
- External users via questionnaire interaction
- Timed status actions: Ex. Escalation
- Automated routing based on record values
The states available for a record are defined by which states are connected to the current state, either by status connectors or special properties ("meta state").
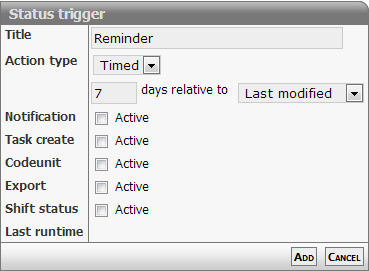
Status action
Status actions are addon functionality bound to a certain status.
When an item fulfills certain criterions, the action is fired resulting in
- Sending of an email (Notification)
- Export and routing of documents (Export)
- Creation of tasks (Task create)
Conditions for triggers can be:
- When entered
- When leaving
- Set amount of time
Read more about it here: Status_actions
Status dependencies
Status dependencies ensure that a certain status can be assigned, after certain criterions are met.
Example:
- Status "Priority handling" dependency: Customer type = "GOLD"

Status flow
Status flows represent legal pathways in the workflow.
In regard to the user interface, only valid options will be displayed i the records status selector. This check is also carried out by the data layer, so the same restrictions apply regardless of the data that was entered by regular users, file imports and the webservice interface.
If a given status can be used from most other states, we recommend using the Status:IsMeta attribute: Meta states can be entered from all other states.
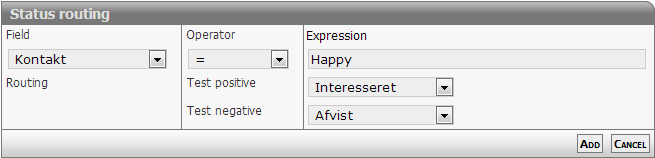
Status routing
The routing feature provides options for changing a records status automatically.
To do routing you need the following
- A test case
- A field reference
- Compare operator (ex. "=")
- Compare value (ex. "Hello world")
- Status set if the test is POSITIVE
- Status set if the test is NEGATIVE
The test is evaluated each time the record is saved, and status is only changed if a valid comparison can be made.
Workflow engine
All entities in the system have workflow / lifecycle model attached to them. In addition all records will have a status field, indicating the records place in its workflow. Each step in a workflow is called a status, and influences how records behave in that step (status).
- What new status can be assigned from here
- What automated actions should be carried out (see below)
- What permissions do the users have in this step
- What fields should be shown or hidden
- What are the time constraints on this part of the process
Automated actions
Entering, leaving or staying in a certain status can trigger certain actions in the system.
Trigger summary
- Enter
- Leave
- Timed
Timed actions are defined as an amount of time, relative to some date fields.
Send an email 1 day before the date defined in the BIRTHDAY field
Execute code 7 days after this status was reached
Actions include
- Notifications
- Task creation
- Code execution (this can do anything)
- Change status
- Export data
- Delete data (GDPR compliance)
Learn more about Status action configuration
Performance measures (LEAN)
For each record in the system it is possible to measure the time spent in a status.
This can be compared to performance targets on
- The whole flow
- A single status
The targets consists of two values
- Goal
- Tolerance
After submitting a ticket, the service desk should optimally respond within 4 hours (goal). We can however accept if it takes 24 hours (tolerance).
We can now easily mark up records depending on their time usage
- Green: Better than goal
- Yellow: Better than tolerance, worse than goal
- Red: Worse than tolerance
This can be visualized on each record using Gauge fields, or in aggregated form via a list report.
Instructions
Setting up measures
- Entity > Advanced
- Set checkmark in
- Define goal and tolerance
- For each Entity > Status
- Define goal and tolerance
- If the status is the last part of a measured workflow check Final
Adding Gauges to an entity
- Visual extra: Visual: Target gauge Step
- Visual extra: Visual: Target gauge Total
Styling
Customized design
To customize the look and feel of your platform, you can exert detailed control of all design elements
- Stylesheets defining colors, graphics and fonts
- Templates (rendering) controlling how pages are rendered
- Wrapper controlling the header and footer on all pages
- Language where labels on buttons are set
- Buttons which controls the iconography
Note that default design is well tested 100% responsive, so take care not using too many !important or fixed width declarations.
Design quickstart
For a most basic functional customer design you can define 3 colors and a URL to a logo.
Instructions
- Designer > Design > Stylesheet
- Edit values in
- themePrimary
- themeSecondary
- background
- Reload page with CTRL + SHIFT + R
Stylesheets
Styling is written using CSS declarations. The different stylesheets can be used both generically, for a single entity or a single interface.
Th TS stylesheets are modular in the sense, that the can inherit content from each other. All stylesheets can refer a parent stylesheet: The parents stylesheets are simply prepended to child stylesheet.
The TS design is based on Bootstrap 4.1, whos declarations can be used and changed if needed.
Colors and most size definitions are set in CSS variables, which which use we strongly encourage.
Instructions
The following will create a new stylesheet and use it on the whole application
- Module > Design > Stylesheet
- Add a new stylesheet
- Specify parent
- Insert CSS declarations
- Note the ID after update
- Modules > Configuration
- Set defaultStylesheet = ID
Context sensitive styling
In some cases your design needs to change according to usecase, user in question or choices made using the application.
By default the following CSS classes are added to the page depending on the situation
- Command requested: Ex. editCommand
- Language selected: Ex. daDK, enUK
- User template: Ex. IsAdministrator, IsAnonoumous
In addition it is possible to add a CSS class to a group, and then all users in that group will have that class added to their page.
Templates
The HTML templates contains tags, that helps the system render correctly. The template can contain both generic field markers, and specific ones tied to a single field. The rendering will first look for a specific tag, and if that is not present default to the generic ones. Templates can be shared between multiple entities, or be tied to a single one.
Note: When editing templates make sure that they are still WCAG compliant. Ordering of elements and ID markup is important for it to work.
Website wrappers
Wrapper allow TempusServa installations to wrap itself in content from other sites.
You provide an URL for page you want to look like, and the server will download and rewrite the contents in the page. The method is however not flawless, and some sites due to poor design or security restrictions cannot be mimicked at all. Normally the contents will get refreshed on fixed schedule, but in some instances it will be required to do some manual tweaking of the code afterwards.
Instructions
- Add a new Wrapper
- Insert URL of the page
- Insert HTML tag where output should begin
- Display the source of the page in another browser
- Note at which tag the dynamic content starts
- Optionally provide an end tag to
- Optionally insert extra code before and after the content
- Test the page
- Change the defaultWrapperID in Designer > Modules > Configuration
Troubleshooting tips
- Check stylesheets for local references (TS will only collect the main page)
- Disable any <form> tags in the page
Multi device
By default all applications built on the platform will work equally well on PC's, phones and tablets.
Certain features on phones are automatically available when using these devices
- Clicking phone numbers will make a call
- Camera will open when adding pictures to a record
TS Gateway App
Frequent mobile users will sometime prefer to have a dedicated app, to have access via an icon and to utilize these phones authentication.
I that case we can register you application in the TS Gateway App, and the users will only have to authenticate themselves a single time. Note on the first login, they will also have to choose what application they are accessing.
In case you want an app with specific name and icon, we build dedicated apps (Apple + iPhone) to your company in 8-10 hours.
Working offline
Applications can be set up to work offline, using cached copies of the website. In the meantime new records can be created and pictures can be attached to the records. When Internet connection is available again, the collected data will be sent to the server.
Contact TS Support to lean more about this feature.
Tenant whitelabeling
The Tenant whitelabeling feature allows you to apply different branding and styling for each ExclusiveGroup in an application.
This is handled by inserting an additional stylesheet into the page, by including a special codeunit page inside ALL pages (displayed at the top).
Limitations:
- Users without an ExclusiveGroup assigned to their user profile will not experience the special styling
- It only works with one ExclusiveGroup per tenant (multiple ExclusiveGroups are not possible)
Configuration:
To apply Tenant whitelabeling to an instance go through the following steps
- Change the configuration "doIncludeGlobalContent" to: true
- Change the configuration "globalContentCodeunit" to: dk.tempusserva.solution.whistleblow.ContentCustomerStylesheet
- Create a stylesheet including the "Group " and the ExclusiveGroup ID - Example: GroupID 123